Developer Guide
- Acknowledgements
- Setting up, getting started
- Design
-
Implementation
- Adding a student to the FYP manager
- Adding a deadline to a student in the FYP manager
- Deleting a student from the FYP manager
- Deleting a deadline from a student in the FYP manager
- Marking a project status
- Editing particulars of a student
- Showing help
- Listing the students and their FYPs
- Finding students based on criterias
- Sorting the FYP manager based on a criteria
- [Proposed] Undo/redo feature
-
ExitFeature
- Documentation, logging, testing, configuration, dev-ops
- Appendix: Requirements
- Appendix: Instructions for manual testing
Acknowledgements
- This project is based on the AddressBook-Level3 project created by the SE-EDU initiative.
- Libraries used: JavaFX, Jackson, JUnit5
Setting up, getting started
Refer to the guide Setting up and getting started.
Design
.puml files used to create diagrams in this document can be found in the diagrams folder. Refer to the PlantUML Tutorial at se-edu/guides to learn how to create and edit diagrams.
Architecture

The Architecture Diagram given above explains the high-level design of the App.
Given below is a quick overview of main components and how they interact with each other.
Main components of the architecture
Main has two classes called Main and MainApp. It is responsible for,
- At app launch: Initializes the components in the correct sequence, and connects them up with each other.
- At shut down: Shuts down the components and invokes cleanup methods where necessary.
Commons represents a collection of classes used by multiple other components.
The rest of the App consists of four components.
-
UI: The UI of the App. -
Logic: The command executor. -
Model: Holds the data of the App in memory. -
Storage: Reads data from, and writes data to, the hard disk.
How the architecture components interact with each other
The Sequence Diagram below shows how the components interact with each other for the scenario where the user issues the command delete -s i/A0123456X.

Each of the four main components (also shown in the diagram above),
- defines its API in an
interfacewith the same name as the Component. - implements its functionality using a concrete
{Component Name}Managerclass (which follows the corresponding APIinterfacementioned in the previous point.
For example, the Logic component defines its API in the Logic.java interface and implements its functionality using the LogicManager.java class which follows the Logic interface. Other components interact with a given component through its interface rather than the concrete class (reason: to prevent outside component’s being coupled to the implementation of a component), as illustrated in the (partial) class diagram below.

The sections below give more details of each component.
UI component
The API of this component is specified in Ui.java

The UI consists of a MainWindow that is made up of parts e.g.CommandBox, ResultDisplay, CompletedStudentListPanel, StatusBarFooter etc. All these, including the MainWindow, inherit from the abstract UiPart class which captures the commonalities between classes that represent parts of the visible GUI.
The UI component uses the JavaFx UI framework. The layout of these UI parts are defined in matching .fxml files that are in the src/main/resources/view folder. For example, the layout of the MainWindow is specified in MainWindow.fxml
The UI component,
- executes user commands using the
Logiccomponent. - listens for changes to
Modeldata so that the UI can be updated with the modified data. - keeps a reference to the
Logiccomponent, because theUIrelies on theLogicto execute commands. - depends on some classes in the
Modelcomponent, as it displaysStudentobject residing in theModel.
Logic component
API : Logic.java
Here’s a (partial) class diagram of the Logic component:

How the Logic component works:
- When
Logicis called upon to execute a command, it uses theFypManagerParserclass to parse the user command. - This results in a
Commandobject (more precisely, an object of one of its subclasses e.g.,AddStudentCommand) which is executed by theLogicManager. - The command can communicate with the
Modelwhen it is executed (e.g. to add a student). - The result of the command execution is encapsulated as a
CommandResultobject which is returned back fromLogic.
The Sequence Diagram below illustrates the interactions within the Logic component for the execute("delete -s i/A0123456X") API call.
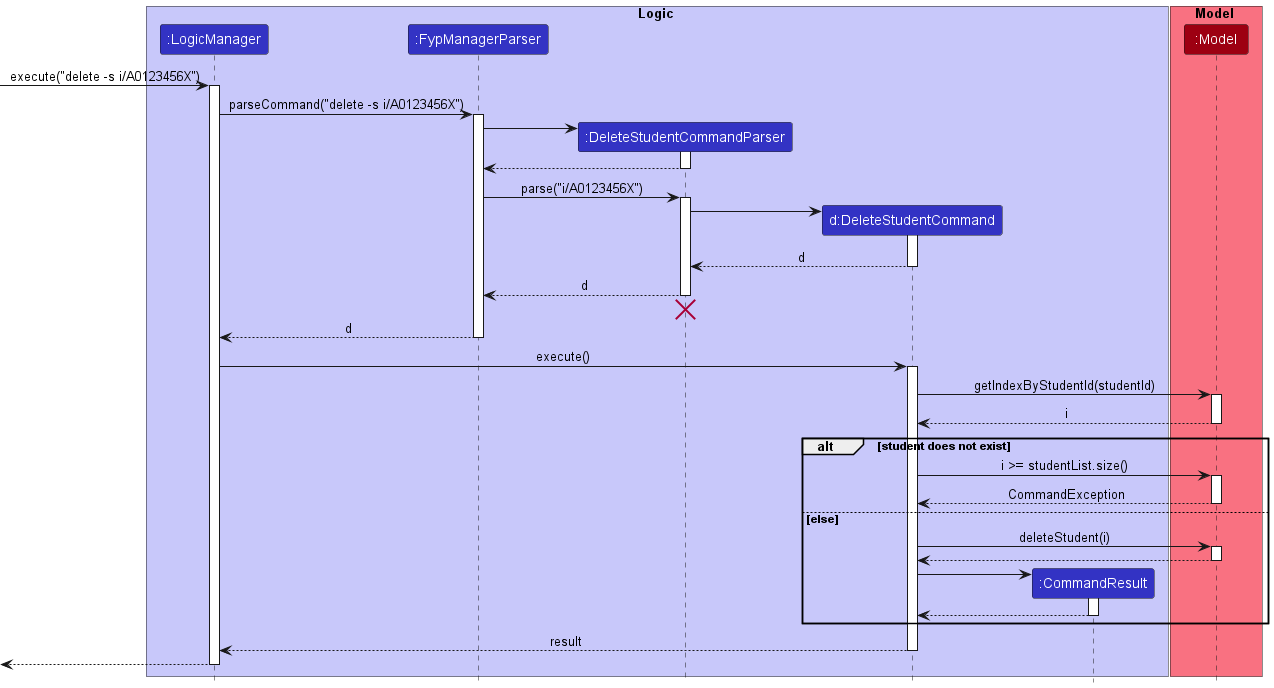
DeleteStudentCommandParser should end at the destroy marker (X) but due to a limitation of PlantUML, the lifeline reaches the end of diagram.
Here are the other classes in Logic (omitted from the class diagram above) that are used for parsing a user command:

How the parsing works:
- When called upon to parse a user command, the
FypManagerParserclass creates anXYZCommandParser(XYZis a placeholder for the specific command name e.g.,AddStudentCommandParser) which uses the other classes shown above to parse the user command and create aXYZCommandobject (e.g.,AddStudentCommand) which theFypManagerParserreturns back as aCommandobject. - All
XYZCommandParserclasses (e.g.,AddStudentCommandParser,DeleteStudentCommandParser, …) inherit from theParserinterface so that they can be treated similarly where possible e.g, during testing.
Model component
API : Model.java

The Model component,
- stores the FYP manager data i.e., all
Studentobjects (which are contained in aUniqueStudentListobject). - stores the currently ‘selected’
Studentobjects (e.g., results of a search query) as a separate filtered list which is exposed to outsiders as an unmodifiableObservableList<Student>that can be ‘observed’ e.g. the UI can be bound to this list so that the UI automatically updates when the data in the list change. - stores a
UserPrefobject that represents the user’s preferences. This is exposed to the outside as aReadOnlyUserPrefobjects. - does not depend on any of the other three components (as the
Modelrepresents data entities of the domain, they should make sense on their own without depending on other components)
Tag list in the FypManager, which Student references. This allows FypManager to only require one Tag object per unique tag, instead of each Student needing their own Tag objects.

Storage component
API : Storage.java

The Storage component,
- can save both FYP manager data and user preference data in json format, and read them back into corresponding objects.
- inherits from both
FypManagerStorageandUserPrefStorage, which means it can be treated as either one (if only the functionality of only one is needed). - depends on some classes in the
Modelcomponent (because theStoragecomponent’s job is to save/retrieve objects that belong to theModel)
Common classes
Classes used by multiple components are in the jeryl.fyp.commons package.
Implementation
This section describes some noteworthy details on how certain features are implemented.
Adding a student to the FYP manager
This feature allows professors as users to keep track of students that are supervised under, as well as the project each student is working on.
Implementation details
The add student feature is facilitated by AddStudentCommandParser and AddStudentCommand. The operation is exposed in the Model interface as Model#addStudent().
Given below is an example usage scenario and how the add student mechanism behaves at each step:
- The user enters the add student command and provides the name of the student, the student ID, the project name, and the student’s email.
-
FypManagerParsercreates a newAddStudentCommandParserafter preliminary processing of user input. -
AddStudentCommandParserthen processes the input again and creates anAddStudentCommand. -
LogicManagerexecutes theAddStudentCommandusing theLogicManager#execute()method. -
AddStudentCommandchecks if the student has existed before usingModel#hasStudent(). - If the student is not inside the student list yet,
AddStudentCommandcallsModel#addStudent()and passes the student as the parameter. - Finally,
AddStudentCommandcreates aCommandResultand returns it toLogicManagerto complete the command.
The following sequence diagram shows how the add student command works:
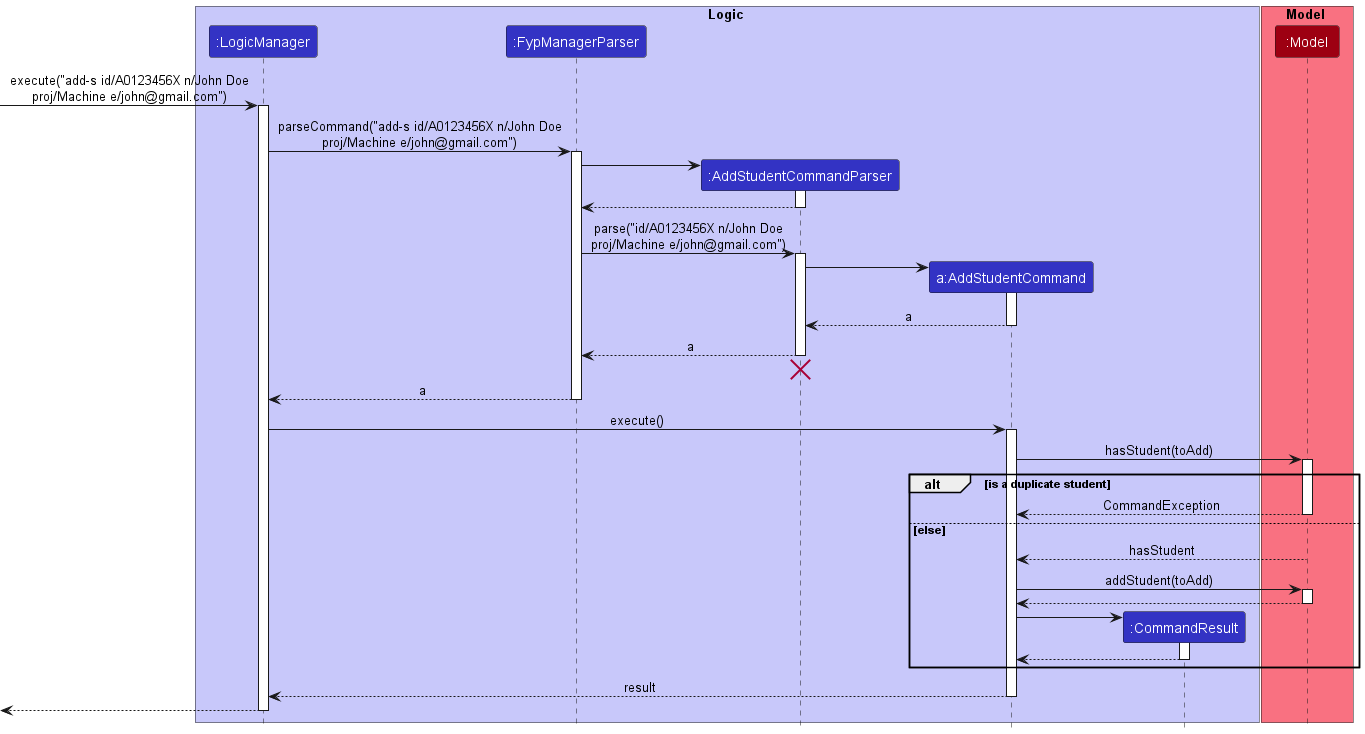
AddStudentCommand should end at the destroy marker (X) but due to a limitation of PlantUML, the lifeline reaches the end of diagram.
Design considerations
An add student command is designed to add a single student along with its detail particulars such as one’s student ID, student name, project name, and email. These details are the important details every professor needs from a student so that the professor can understand the work of the student and is able to contact the student when needed.
Adding a deadline to a student in the FYP manager
This feature allows professors as users to keep track of students deadlines that are supervised under.
Implementation details
The add student feature is facilitated by AddDeadlineCommandParser and AddDeadlineCommand. The operation is exposed in the Model interface as Model#addDeadline().
Given below is an example usage scenario and how the add deadline mechanism behaves at each step:
- The user enters the add deadline command and provides the name of the deadline, the student ID, and deadline date(optional parameter).
-
FypManagerParsercreates a newAddDeadlineCommandParserafter preliminary processing of user input. -
AddDeadlineCommandParserthen processes the input again and creates anAddDeadlineCommand. -
LogicManagerexecutes theAddDeadlineCommandusing theLogicManager#execute()method. -
AddDeadlineCommandgets student using StudentID viaModel#getStudentByStudentId(studentId). -
AddDeadlineCommandchecks if the deadline has existed before usingModel#hasDeadline(). -
AddDeadlineCommandchecks if the project is done usingStudent#getProjectStatus().equals(new ProjectStatus("DONE")). - If the deadline is not inside the student deadline list yet,
AddDeadlineCommandcallsModel#addDeadline()and passes the student and deadline as the parameter. - Finally,
AddDeadlineCommandcreates aCommandResultand returns it toLogicManagerto complete the command.
The following sequence diagram shows how the add deadline command works:
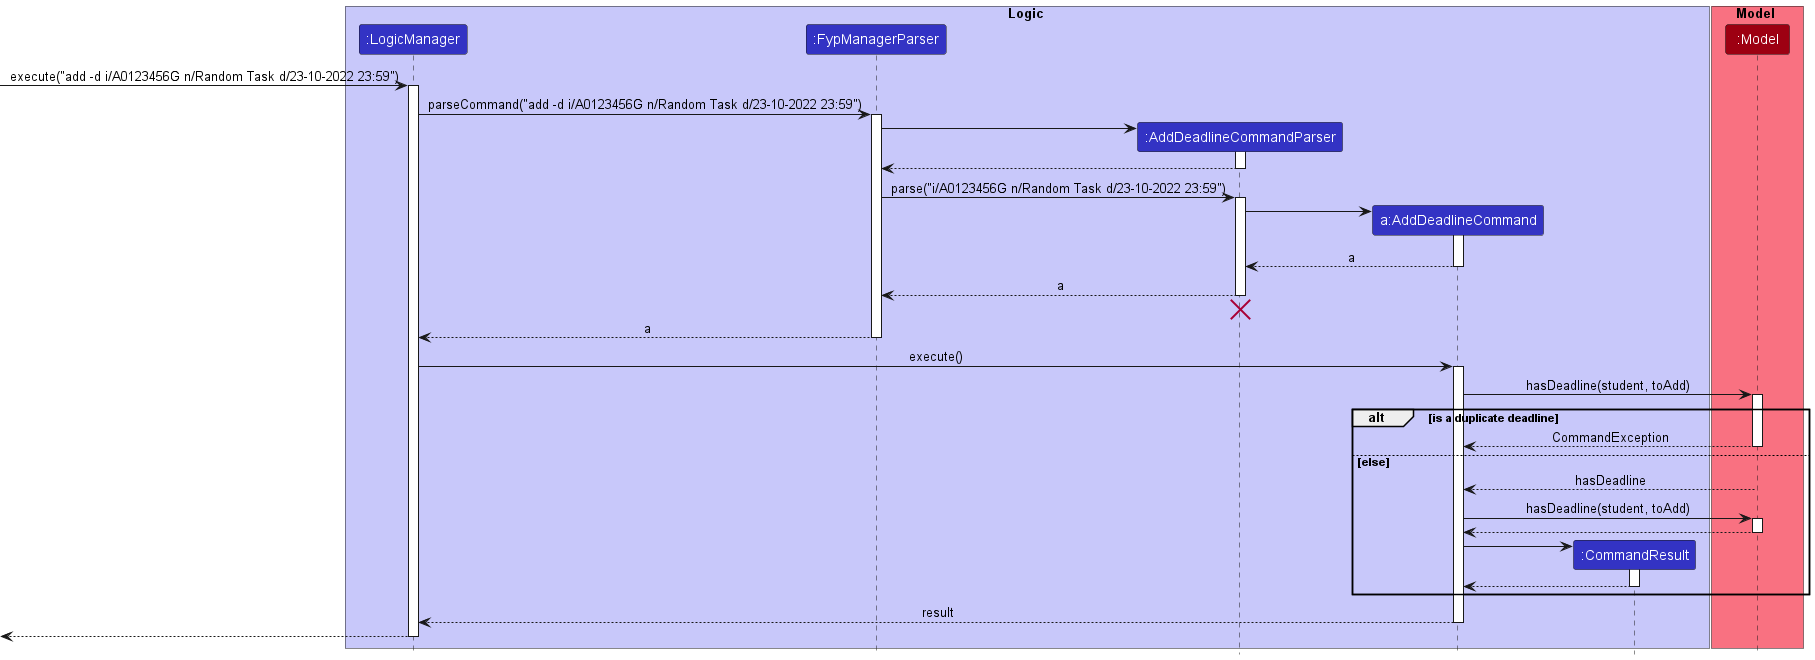
AddDeadlineCommand should end at the destroy marker (X) but due to a limitation of PlantUML, the lifeline reaches the end of diagram.
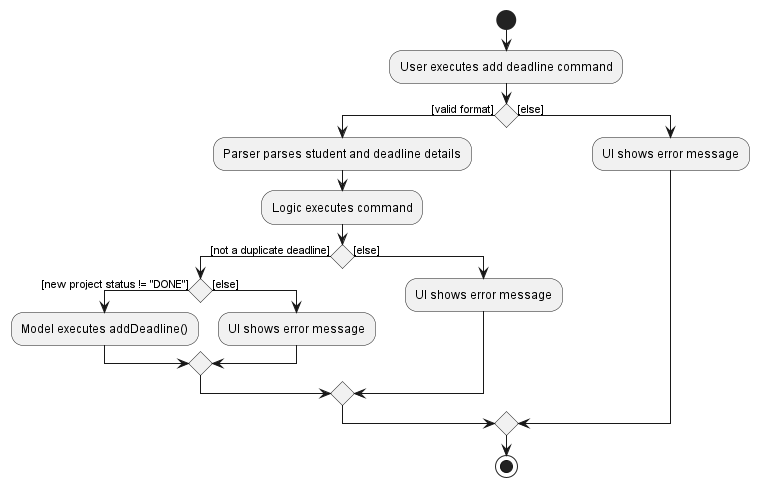
The following activity diagram summarizes what happens when a user executes an add deadline command.
Design considerations
An add deadline command is designed to add a single deadline along with its deadline date to a particular student. This helps the professor to keep track of which deadline is assigned to which student easily.
Deleting a student from the FYP manager
This feature allows professors to delete students who have dropped their FYP
Implementation details
The delete student feature is facilitated by DeleteStudentCommandParser and DeleteStudentCommand. The operation is exposed in the Model interface as Model#DeleteStudent().
Given below is an example usage scenario and how the delete student mechanism behaves at each step:
- The user enters delete student command and provides the student ID of student to be deleted.
-
FypManagerParsercreates a newDeleteStudentCommandParserafter preliminary processing of user input. -
DeleteStudentCommandParsercreates a newDeleteStudentCommandbased on the processed input. -
LogicManagerexecutes theDeleteStudentCommand. -
DeleteStudentCommandcallsModel#getFilteredStudentList()to get the list of student with FYP, and then gets the student at the specified index using the unique studentId. -
DeleteStudentCommandcallsModel#DeleteStudent()and passes the studentID, and return student deleted as parameters. - Finally,
DeleteStudentCommandcreates aCommandResultand returns it toLogicManagerto complete the command.
The following sequence diagram shows how delete student command works:

DeleteStudentCommand should end at the destroy marker (X) but due to a limitation of PlantUML, the lifeline reaches the end of diagram.
The following activity diagram summarizes what happens when a user executes a delete student command.
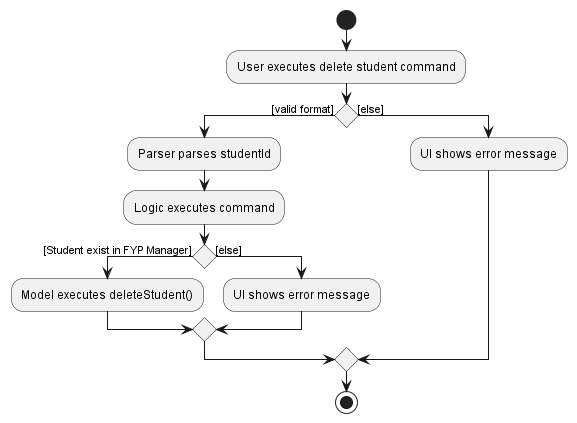
Design considerations
The delete student command is designed to be used in conjunction with find student command. For instance, the user would first use find student using project name to find the student taking FYP using find machine
to find students taking machine learning projects before doing delete -s i/A0123456X to remove student from FYP Manager.
This integration between delete student command with find student command is important because FypManager can store large number of students with FYP, making it not feasible for users to scroll through the list. By utilizing find student, users can find the student with only partial information and retrieve the student ID Using this student ID, users can delete the student from the FypManager once he/she drops the FYP.
Deleting a deadline from a student in the FYP manager
Implementation details
The delete deadline feature is facilitated by DeleteDeadlineCommandParser and DeleteDeadlineCommand. The operation is exposed in the Model interface as Model#DeleteDeadline().
Given below is an example usage scenario and how the delete deadline mechanism behaves at each step:
- The user enters delete deadline command and provides the student ID and rank of deadline to be deleted.
-
FypManagerParsercreates a newDeleteDeadlineCommandParserafter preliminary processing of user input. -
DeleteDeadlineCommandParsercreates a newDeleteDeadlineCommandbased on the processed input. -
LogicManagerexecutes theDeleteDeadlineCommand. -
DeleteCommandcallsModel#getIndexByStudentId(index)and passes the studentId, and gets the desired student. -
DeleteCommandcallsStudent#getDeadlineList().getDeadlineByRank(rank - 1)and passes the rank, and gets the deadline. -
DeleteDeadlineCommandcallsModel#deleteDeadline()and passes the student, and deadline to be deleted. - Finally,
DeleteDeadlineCommandcreates aCommandResultand returns it toLogicManagerto complete the command.
The following sequence diagram shows how delete deadline command works:
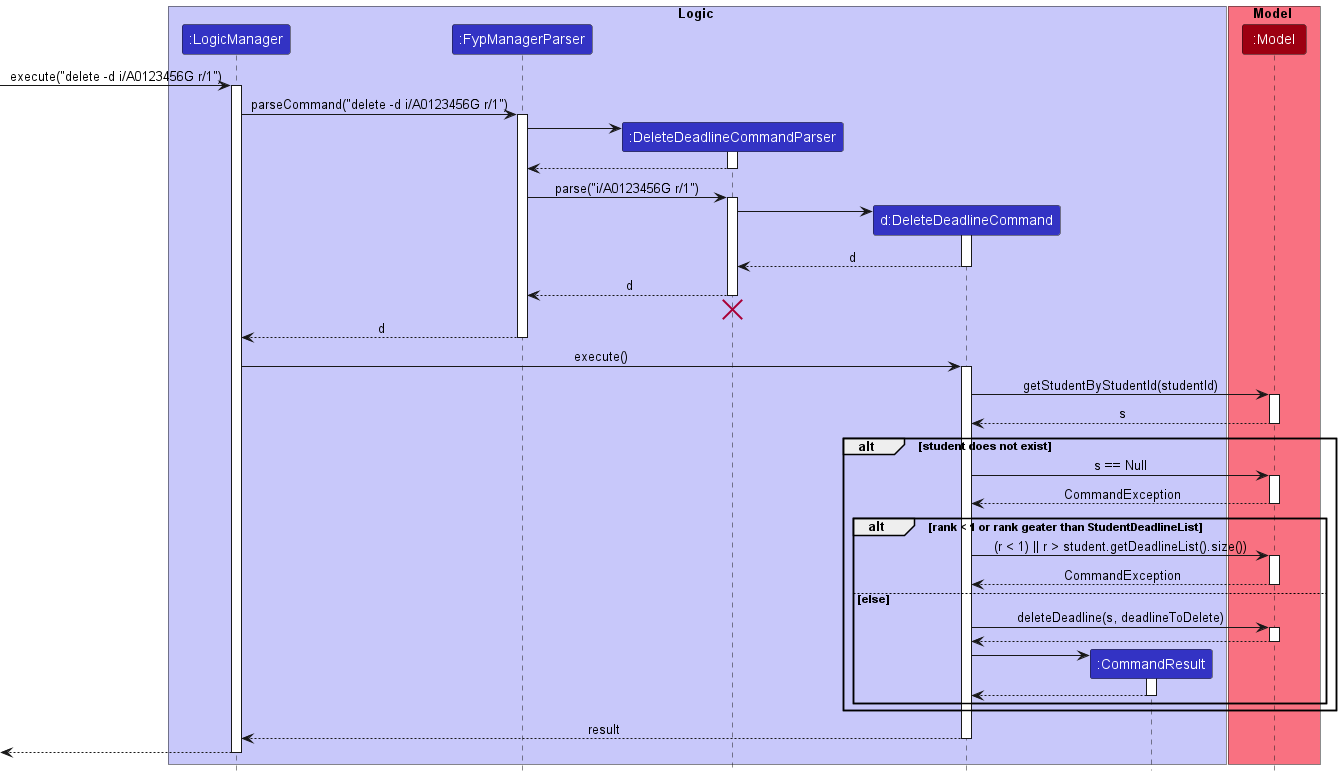
DeleteDeadlineCommand should end at the destroy marker (X) but due to a limitation of PlantUML, the lifeline reaches the end of diagram.
The following activity diagram summarizes what happens when a user executes a delete deadline command.
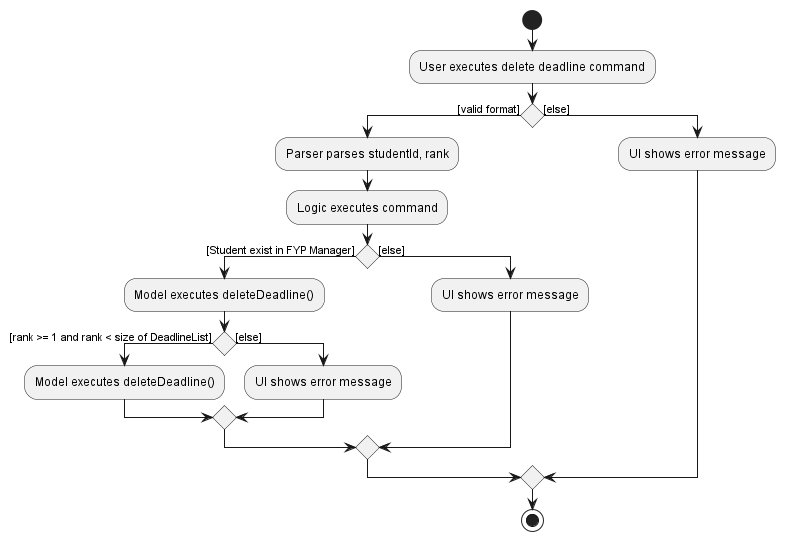
Design considerations
The delete deadline command is designed to be used in conjunction with find student command. For instance, the user would first use find student using project name to find the student taking FYP using find machine
to find students taking machine learning projects before doing delete -d i/A0123456X r/1 to remove student from FYP Manager.
This integration between delete deadline command with find student command is important because FypManager can store large number of students with FYP, making it not fesiable for users to scroll through the list. By utilizing find student, users can find the student with only partial information and retrieve the student ID Using this student ID, users can delete the deadline from the FypManager once he/she drops the deadline task.
Marking a project status
Implementation details
The MarkCommand feature marks the Project Status of an FYP project as one of 3 possible statuses {YTS, IP, DONE}. Currently these are the only 3 statuses supported, although more may be implemented later on if there are other meaningful statuses.
The MarkCommand feature sets a default status of YTS whenever a new FYP project is added to the FYP Manager, and the
MarkCommand allows us to accordingly the project Status to either IP if the student is still
working on the FYP project, or DONE once the FYP project has been completed.
Given below is an example usage scenario and how MarkCommand is utilised:
Step 1: The Professor launches the application for the first time. FypManager will be initialised with the
current FypManager state.
Step 2: The Professor tries adding a student to the FypManager by executing the command
add i/A0123456G .... Note that here we have set the default project Status to be YTS since
the project has just been added.
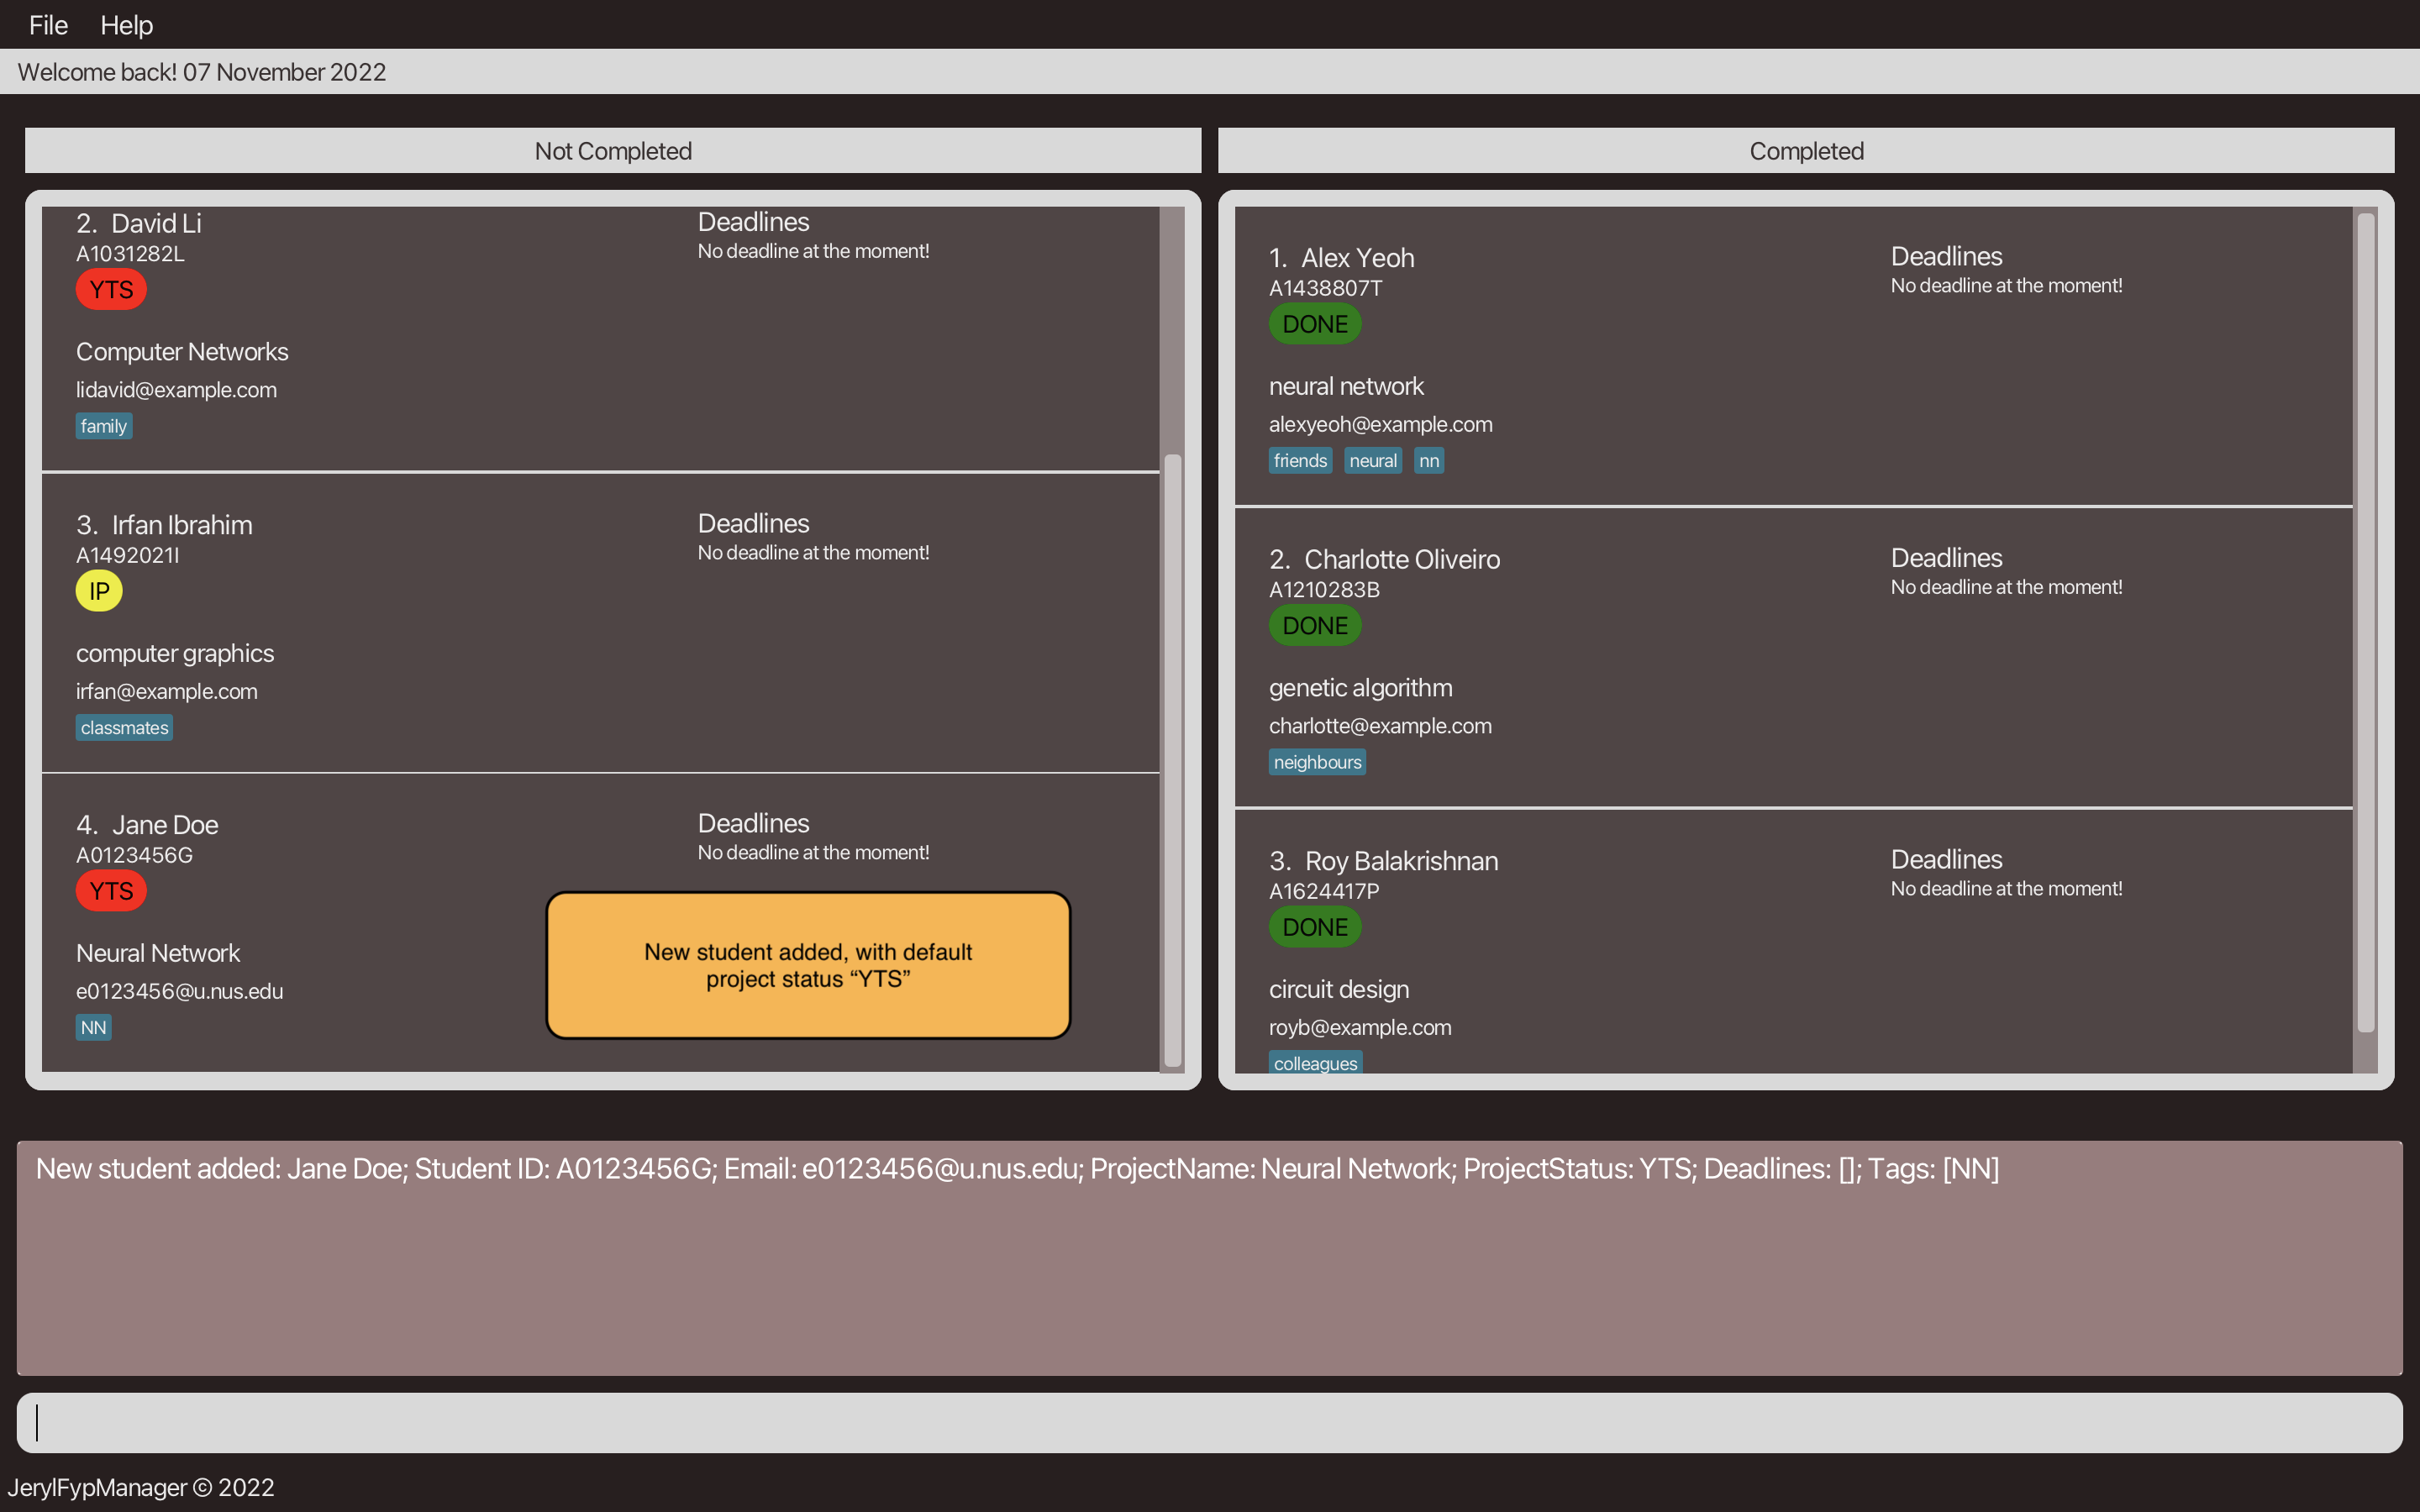
Step 3: Suppose that the student Jane Doe has now started on the project. The Professor wishes to update the
project status for Jane to be IP instead of YTS, hence the Professor will execute the command
mark i/A0123456G s/IP to update the status accordingly.
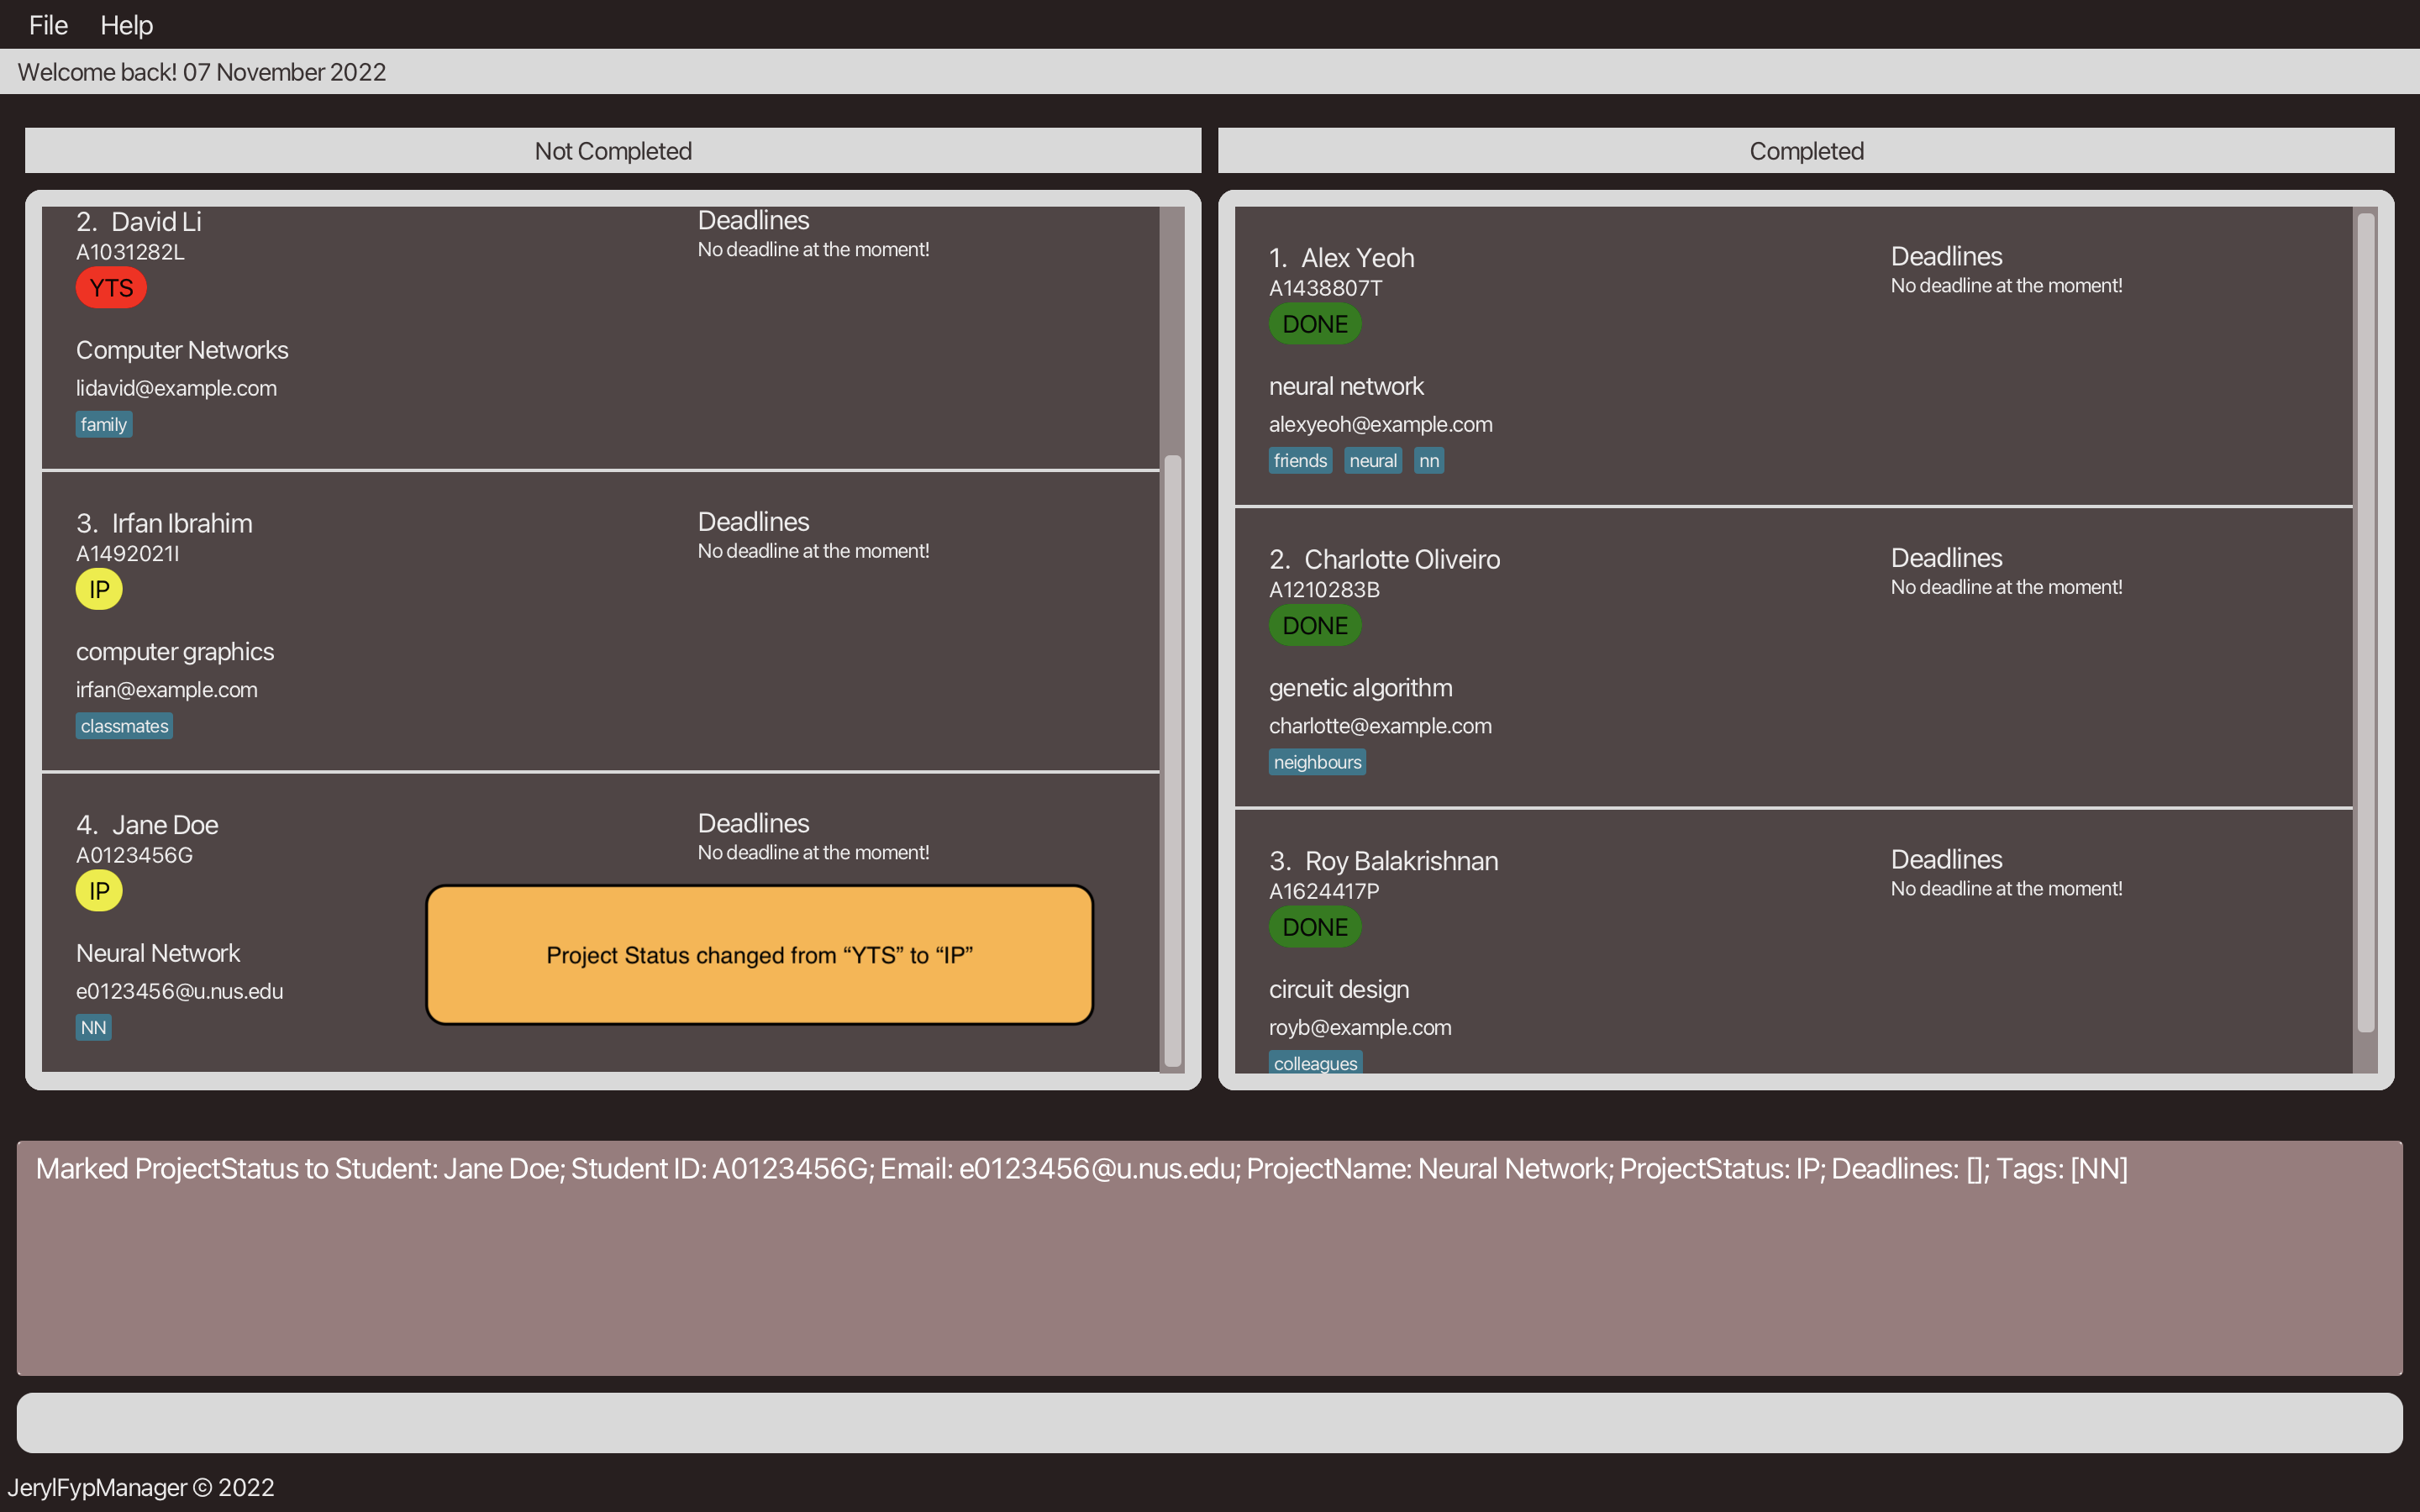
YTS, IP, DONE}, then the command will not be executed and an appropriate
error message will be shown.
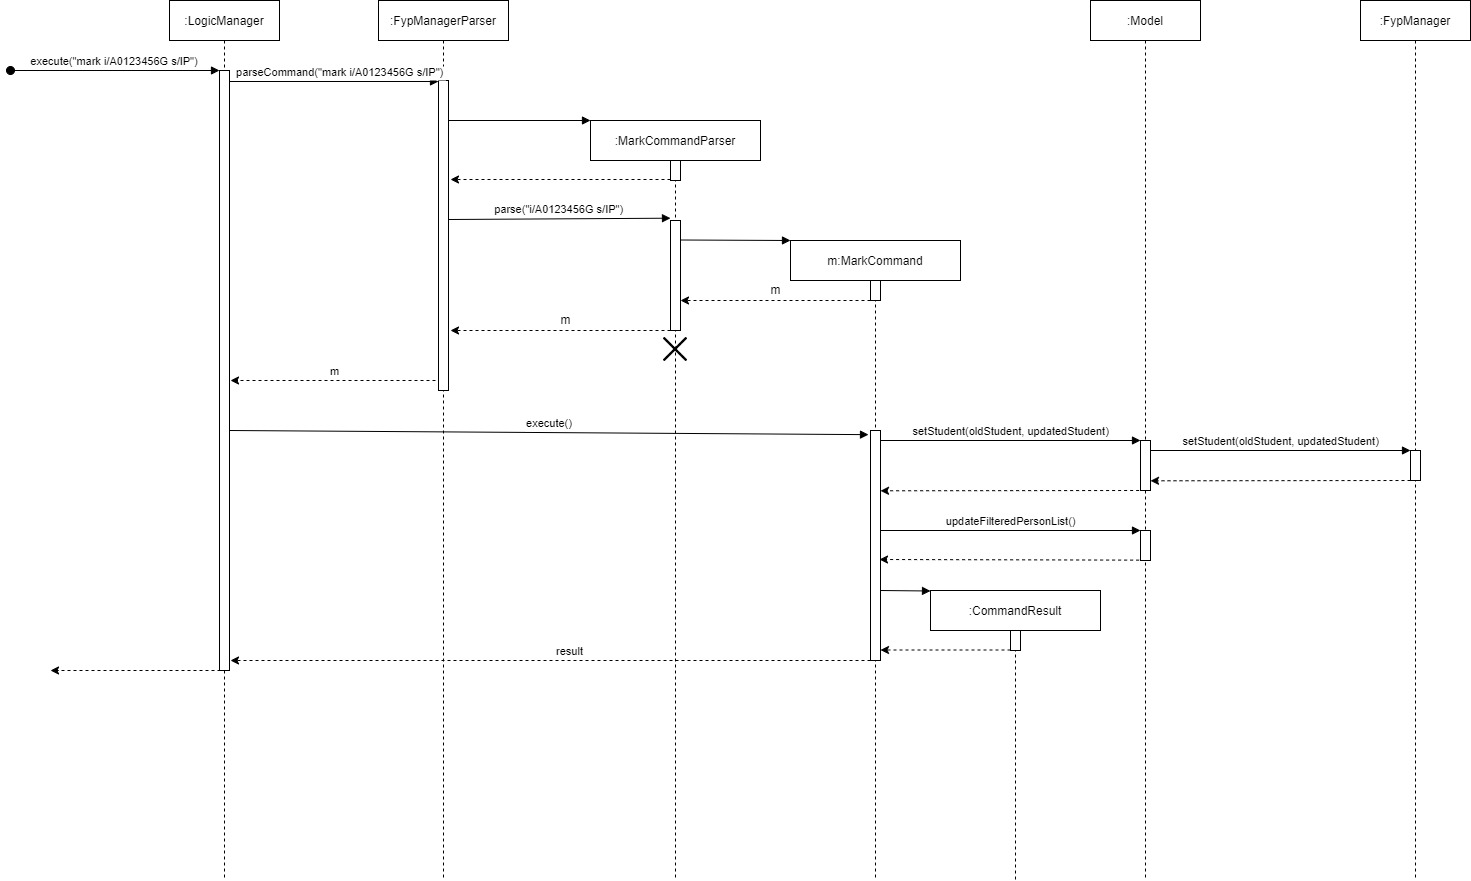
The following sequence diagram shows how the MarkCommand operation works:
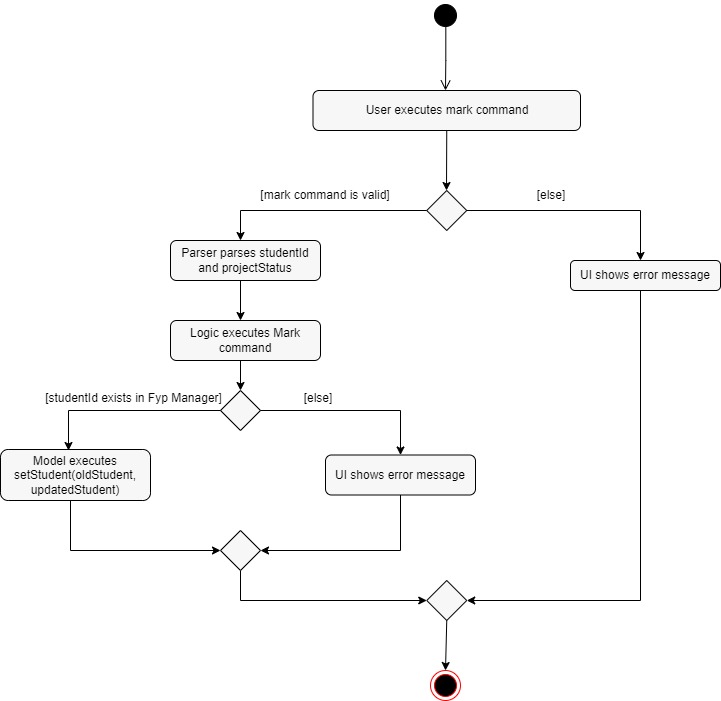
The following activity diagram illustrates what happens when a user executes MarkCommand:
Design considerations
Implementation Choice: Why MarkCommand is implemented this way
-
We have only chosen to consider 3 general statuses {
YTS,IP,DONE} since these are very general labels that the Professor can use to identify the current status of an FYP project. This makes it very user-friendly since there are a fixed number of statuses that can be used. -
We have also used the studentId to uniquely identify the project of the student the Professor is trying to find. Here we have made an assumption that there the StudentId uniquely identifies the FYP project (i.e. a student can only take exactly 1 FYP project under a certain Professor) This makes the Mark Command relatively easy to use in practice.
Other Alternatives:
-
Alternative 1: Extend the Edit command to include the MarkCommand
- Pros: Easier to implement.
- Cons: No clear distinction between tags and project status
Implementation details
The edit student feature is facilitated by EditCommandParser and EditCommand. The operation is exposed in the Model interface as Model#Edit().
Given below is an example usage scenario and how the edit student mechanism behaves at each step:
- The user enters delete deadline command and provides the student ID and other parameters(eg: student name, project name) to be changed to.
-
FypManagerParsercreates a newEditCommandParserafter preliminary processing of user input. -
EditCommandParsercreates a newEditCommandbased on the processed input. -
LogicManagerexecutes theEditCommand. -
EditCommandcallsModel#getFilteredStudentList()and gets the student list. -
EditCommandcallsModel#getIndexByStudentId(i)and passes the studentId, and gets the desired student. -
EditCommandcallsEditCommand#createEditedStudent(student, parameters)and passes the student and parameters to be edited to. -
EditCommandcallsEditCommand#setStudent(studentToEdit, editedStudent)and passes the student and previous student object to be replaced. -
EditCommandcallsEditCommand#updateFilteredStudentList(PREDICATE_SHOW_ALL_STUDENTS)and updates the studentList. - Finally,
EditCommandcreates aCommandResultand returns it toLogicManagerto complete the command.
The following sequence diagram shows how edit student command works:
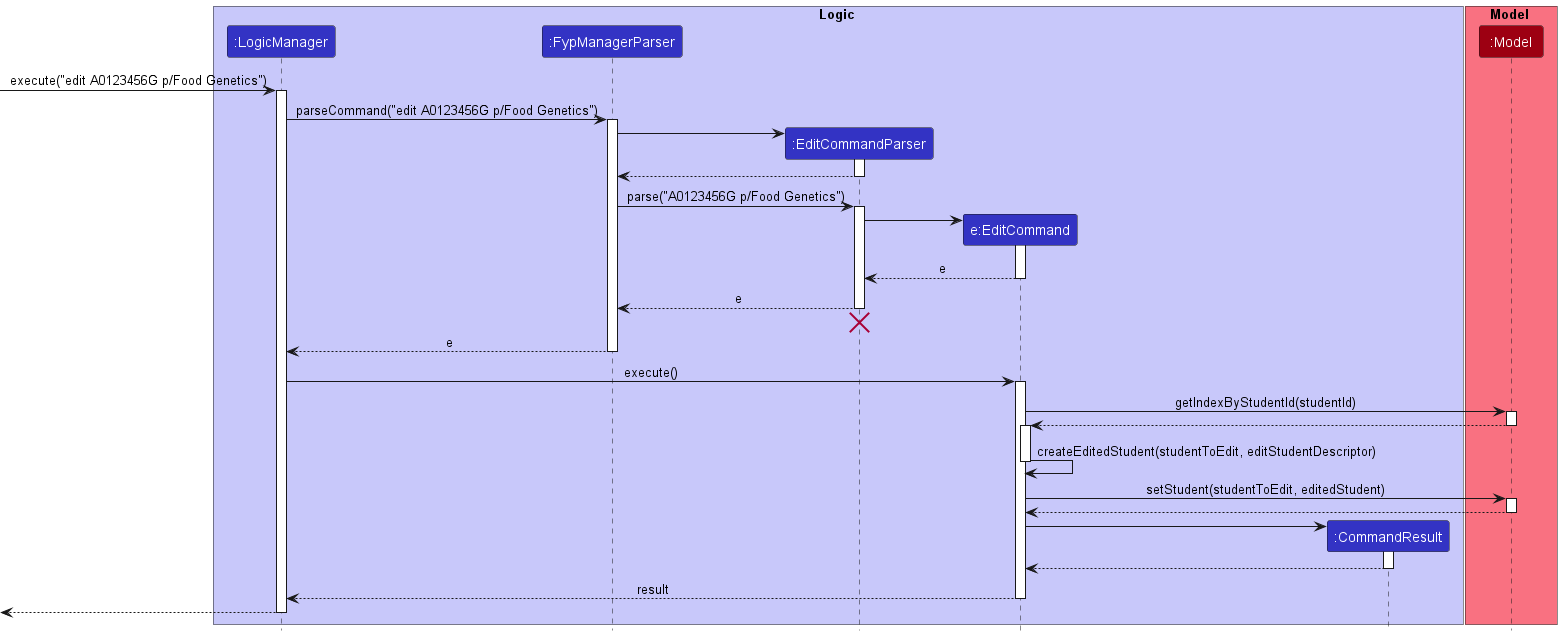
EditCommand should end at the destroy marker (X) but due to a limitation of PlantUML, the lifeline reaches the end of diagram.
Also, due to PlantUML limitations, we are not able to clearly show self-invocation methods well. Do take note that arrow supposed to start at beginning of activation bar and end at end of activation bar.
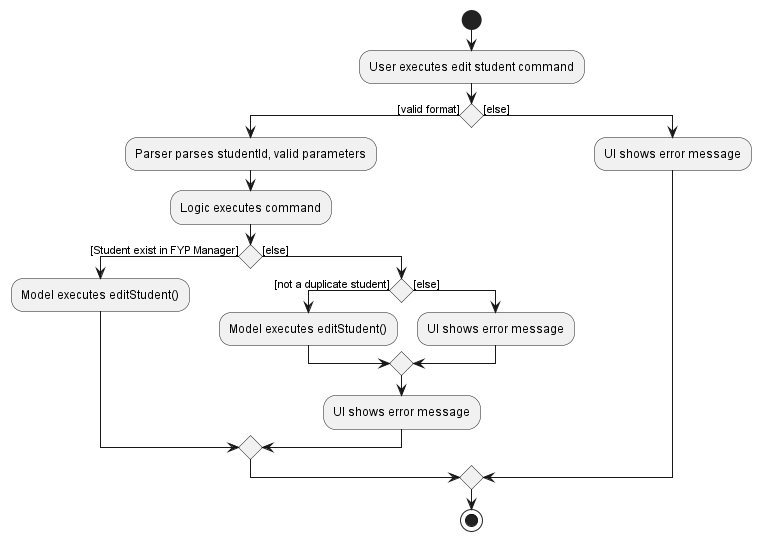
Editing particulars of a student
The following activity diagram summarizes what happens when a user executes an edit command.
Design considerations
The edit command is designed to be used in conjunction with find student command. For instance, the user would first use find student using project name to find the student taking FYP using find machine
to find students taking machine learning projects before doing edit A0123456X p/AI to edit the student in FypManager.
This integration between edit command with find student command is important because FypManager can store large number of students with FYP, making it not feasible for users to scroll through the list. By utilizing find student, users can find the student with only partial information and retrieve the student ID Using this student ID, users can edit the student attributes from the FypManager.
Showing help
Implementation
The help feature provides the professor or students with useful information on how to optimally make use of this Jeryl app.
The help feature mechanism is facilitated by HelpCommand and HelpCommandParser. HelpCommand extends from the abstract class Command
while HelpCommandParser extends from the interface Parser.
To summarize, it implements the following operation:
-
HelpCommand#execute()— oversees the execution process forHelpCommand.
Given below is an example usage scenario of HelpCommand:
- The user enters the
helpcommand or also provides the specific command of interest. -
FypManagerParsercreates a newHelpCommandParserafter preliminary check of user input. -
HelpCommandParsercreates a newHelpCommandbased on the processed input (different type of command keyword). -
LogicManagerexecutes theHelpCommandusing theLogicManager#execute()method. -
HelpCommandshows help message, and then creates aCommandResultand returns it toLogicManagerto complete the command. - If it is just
HelpCommand,HelpWindowwould pop up with a link to JERYL user guide on it.
The following sequence diagram shows how the help command works:
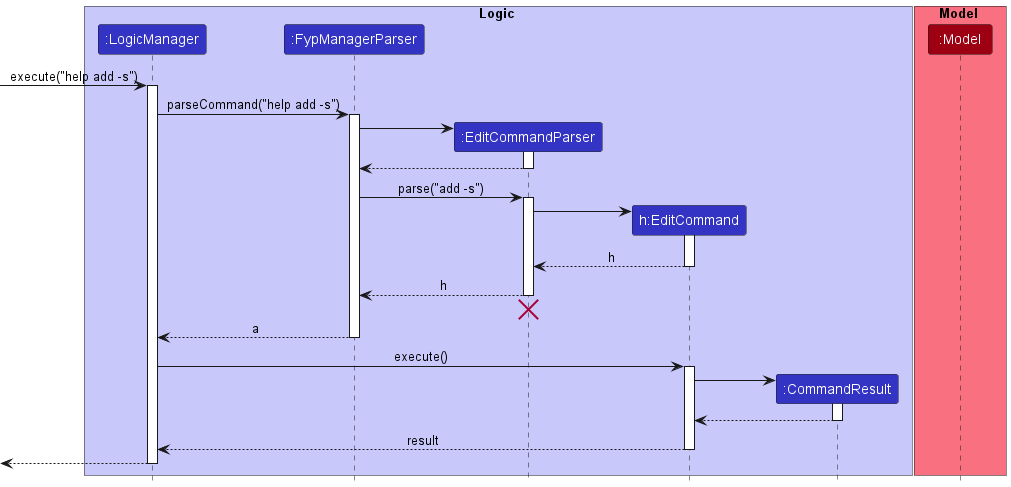
HelpCommand should end at the destroy marker (X) but due to a limitation of PlantUML, the lifeline reaches the end of diagram.
The following activity diagram summarizes what happens when a user executes am help command.
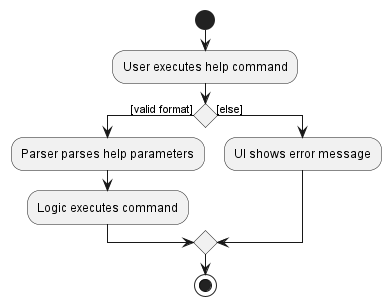

Listing the students and their FYPs
Implementation details
The list feature allows the professor to list all FYP students in the FYP Manager.
The list feature mechanism is facilitated by ListCommand. It extends from the abstract class Command.
To summarize, it implements the following operation:
-
ListCommand#execute()— oversees the execution process forListCommand.
Given below is an example usage scenario of ListCommand:
- The user enters the list command
-
FypManagerParsercreates a newListCommandafter preliminary check of user input. -
LogicManagerexecutes theListCommandusing theLogicManager#execute()method. -
ListCommandupdates aObservableList<Student>, and then creates aCommandResultand returns it toLogicManagerto complete the command.
The following sequence diagram shows how the list command works:
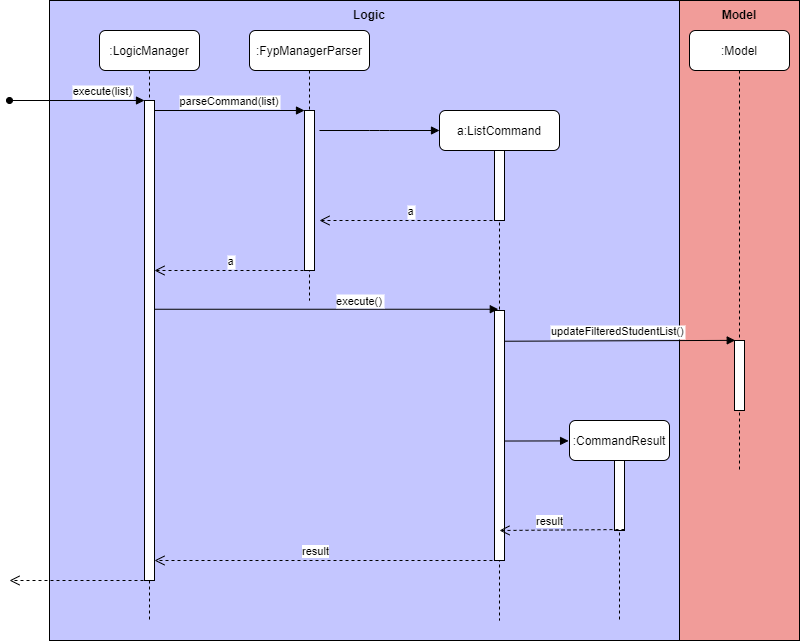
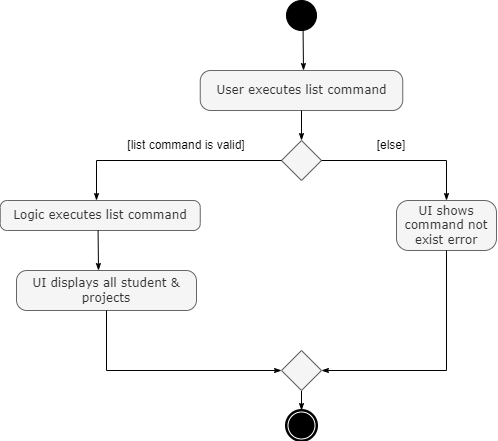
The following activity diagram summarizes what happens when a user executes a list command:
Finding students based on criterias
Implementation details
The FindCommand feature allows the user to find for specific keywords in certain fields. The current
implementation supports finding keywords in four fields:
1) StudentId
2) StudentName
3) Tags (accorded to a student)
4) ProjectName.
This is a new enhancement in v1.3, as older iterations only supported finding projects by their titles, while the newest iteration supports finding projects by any of the above four fields. We hope that this allows the user to be able to filter the projects more efficiently. (for instance, by project names: NeuralNetwork, Blockchain, etc.)
The FindCommand feature takes in a specified field (one of the four aforementioned fields), and a keyword specified by the user. FypManager then returns a list of projects whose field contains the keyword inputted.
Note that the keyword is case-insensitive, can contain arbitrary spacing, and is field-specific.
Given below is an example usage scenario and how FindCommand is utilised:
Step 1. The user launches the application for the first time. The ‘FypManager’ will be initialised with its ‘FypManager’ state.
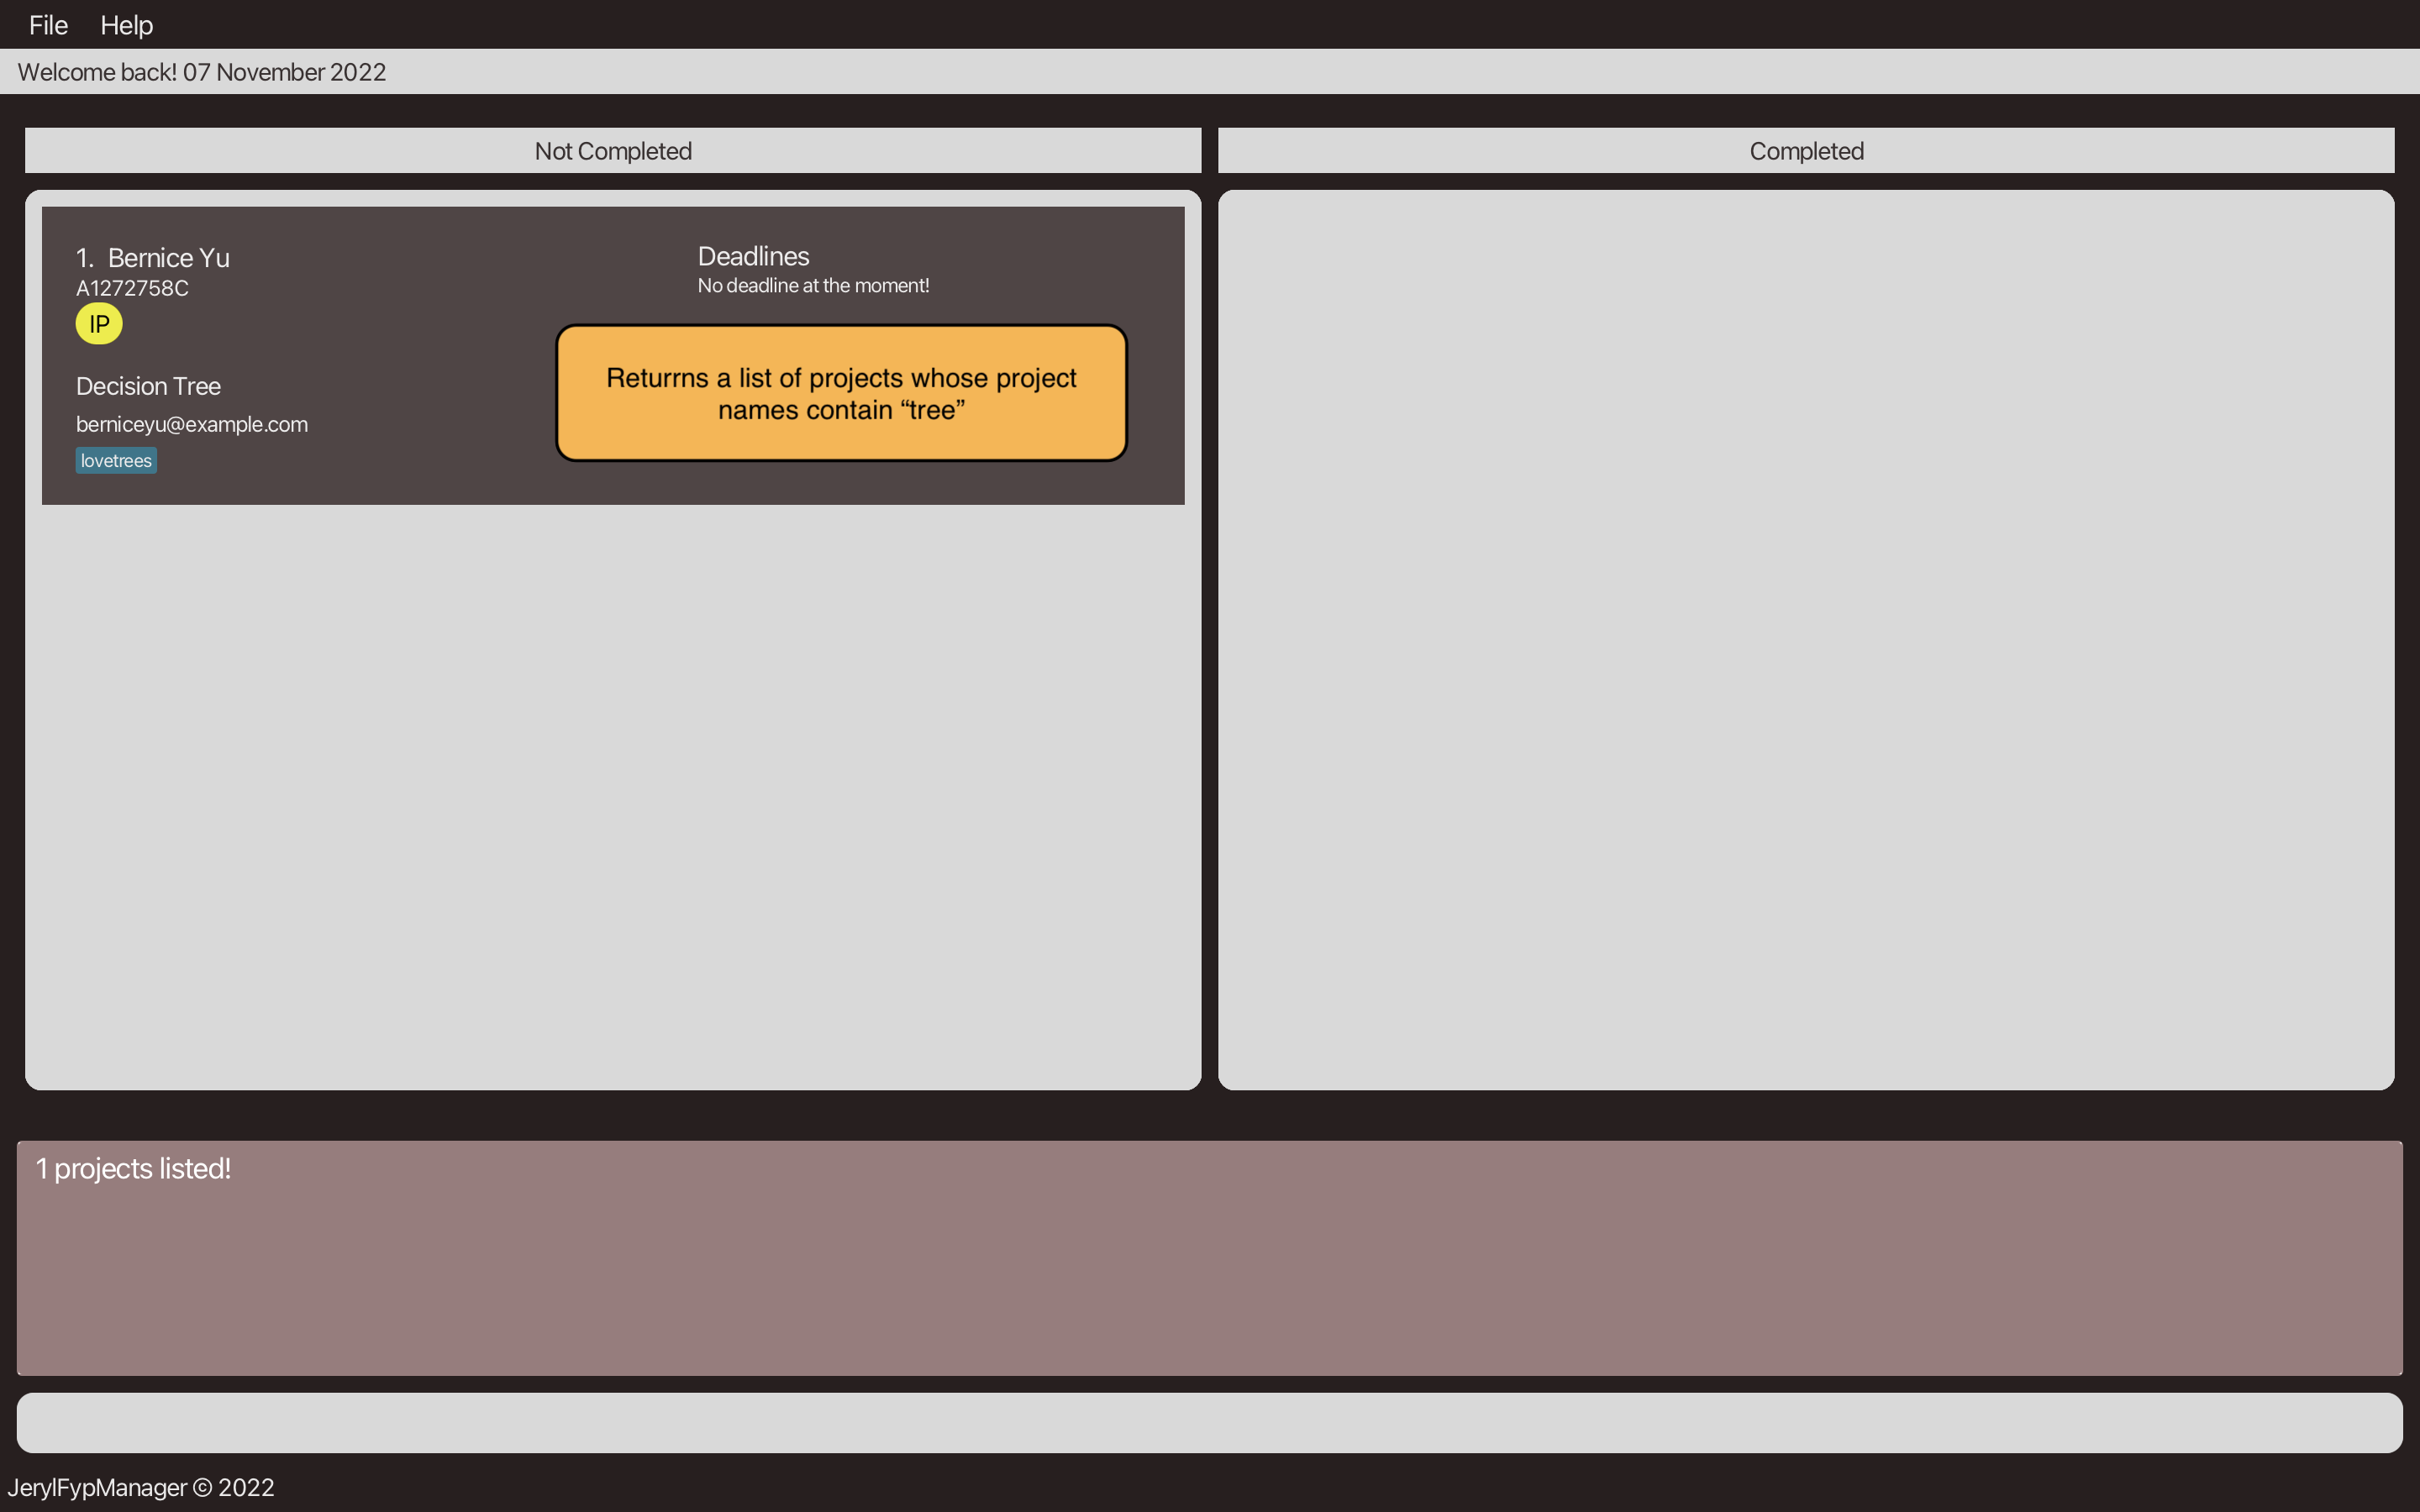
Step 2: The user finds a project by keying in find -p tree to find all projects whose name contains the keyword
tree. FypManager returns a list of projects whose names contain the tree keyword.
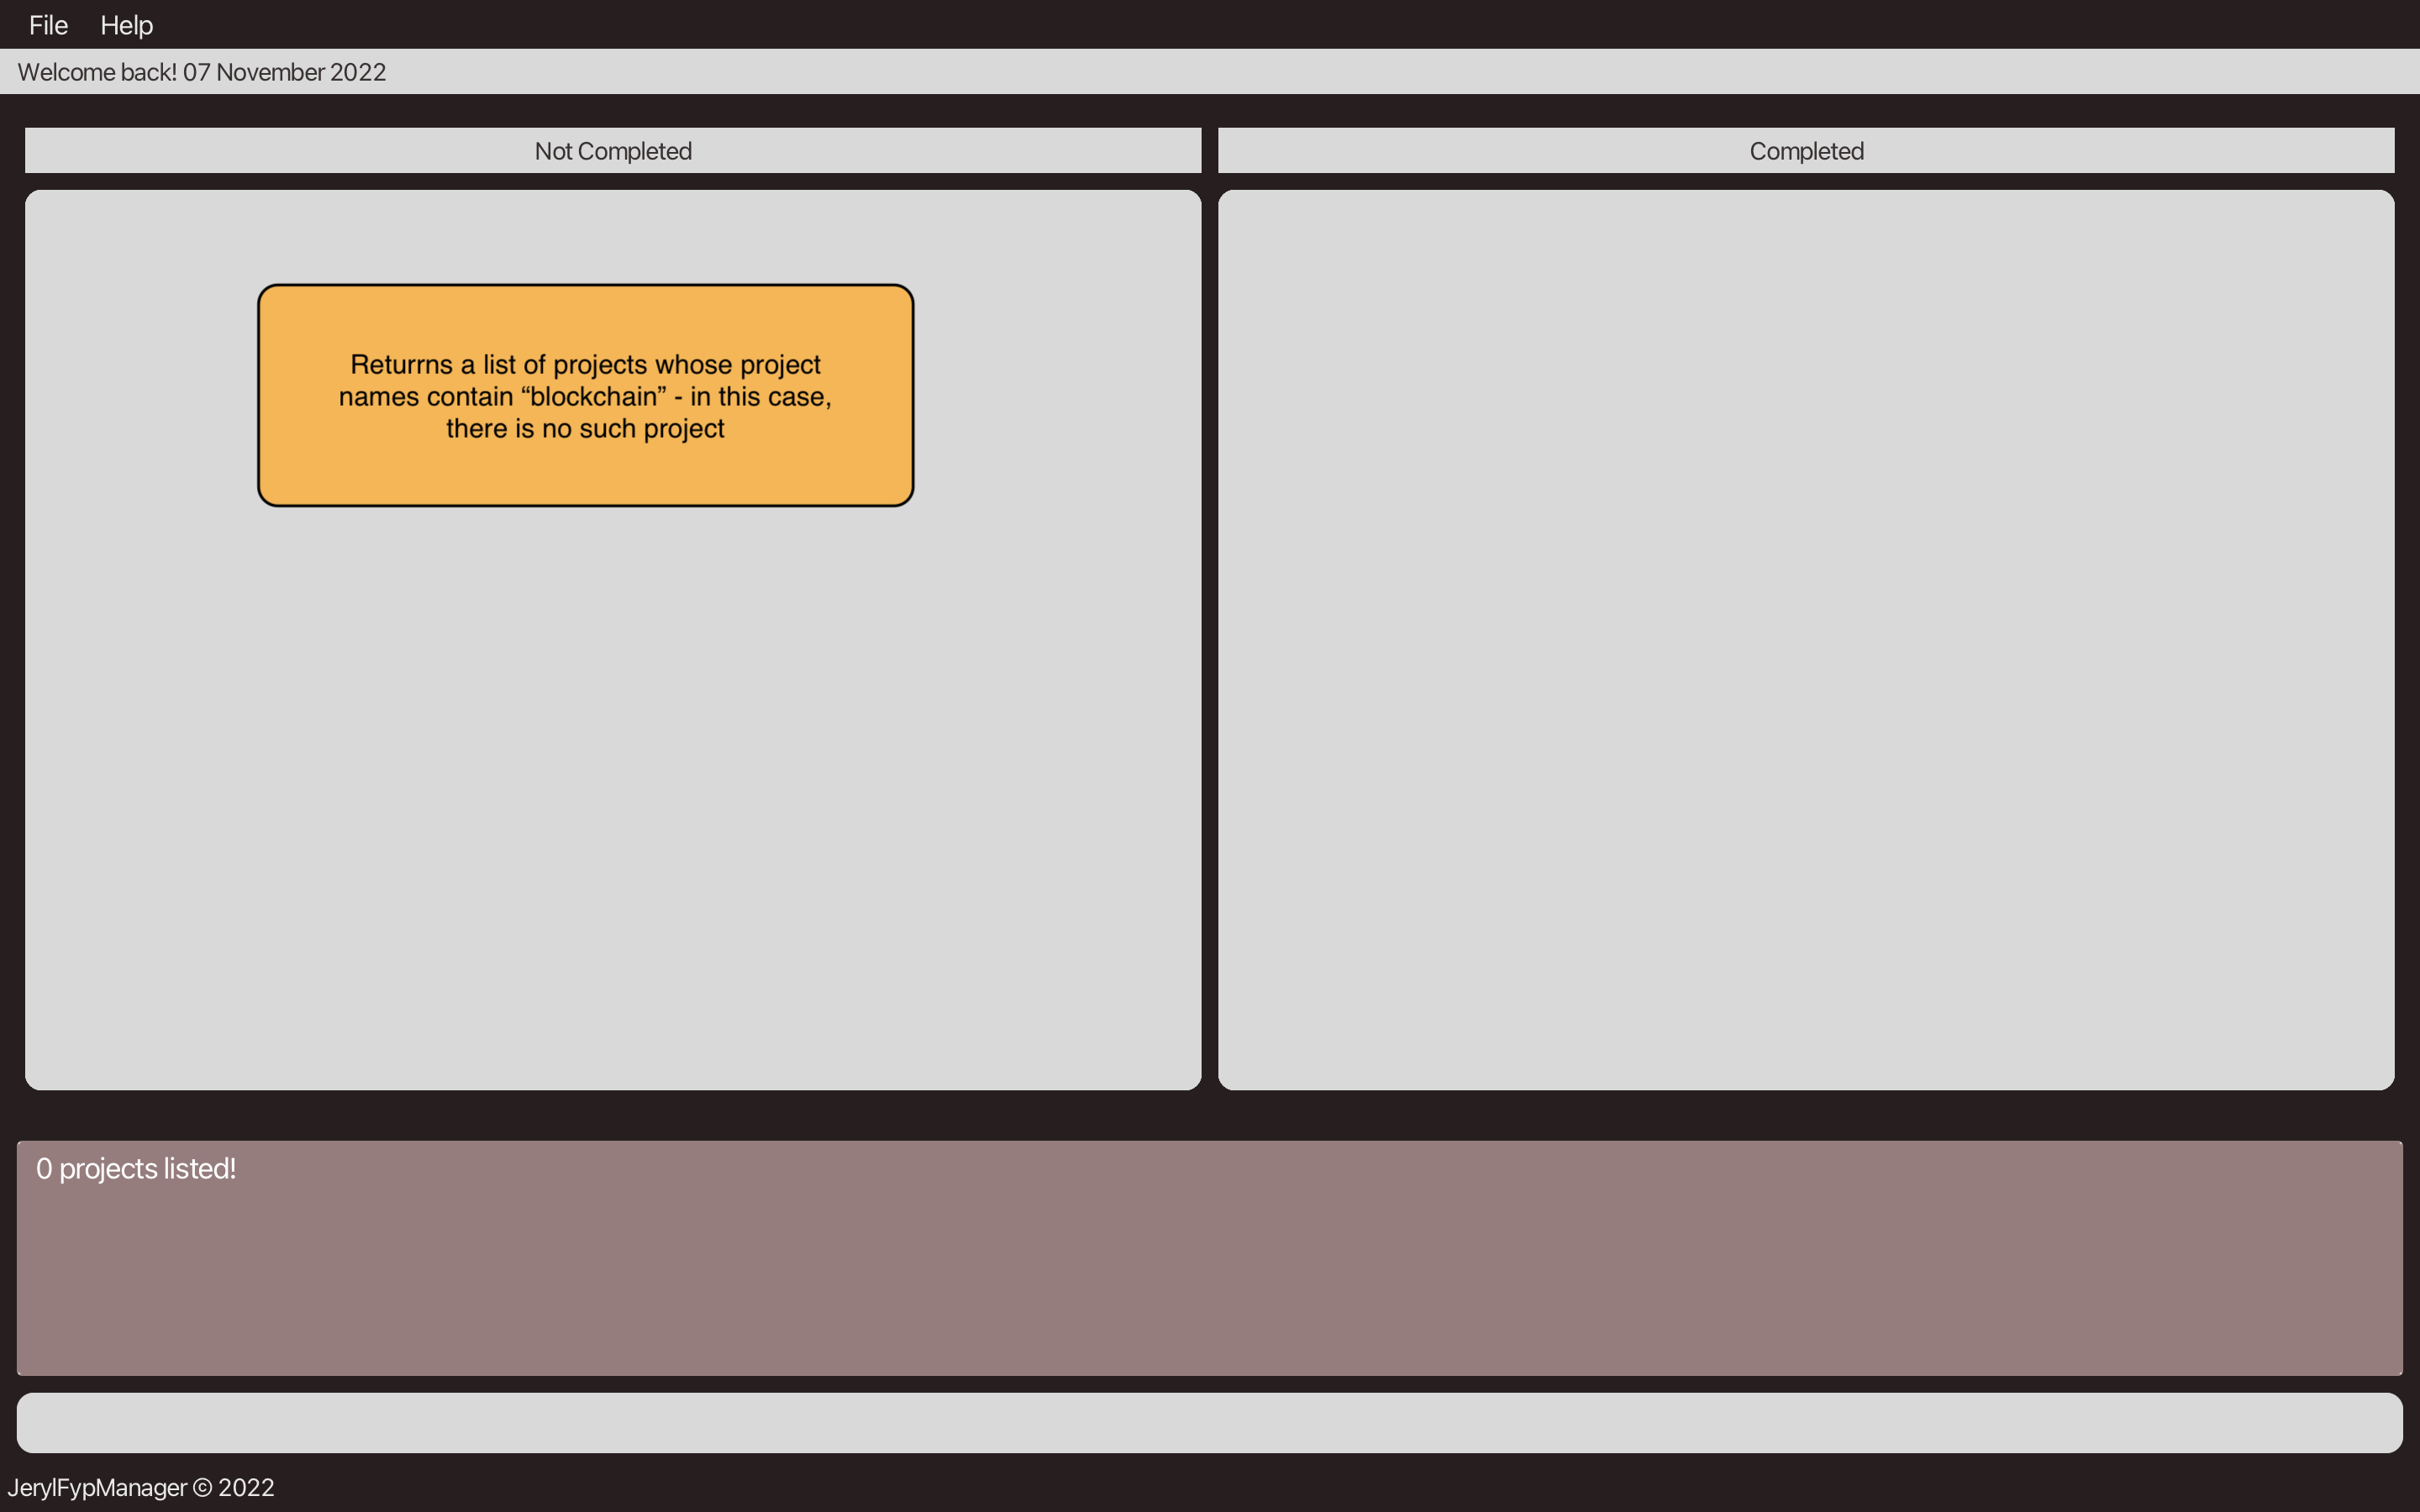
Step 3: Suppose that the user wants to find another project with keyword blockchain. The user keys in
find -p blockchain to find all projects whose names contain the keyword blockchain. FypManager returns an empty
list, as there is no project whose project name contains blockchain.
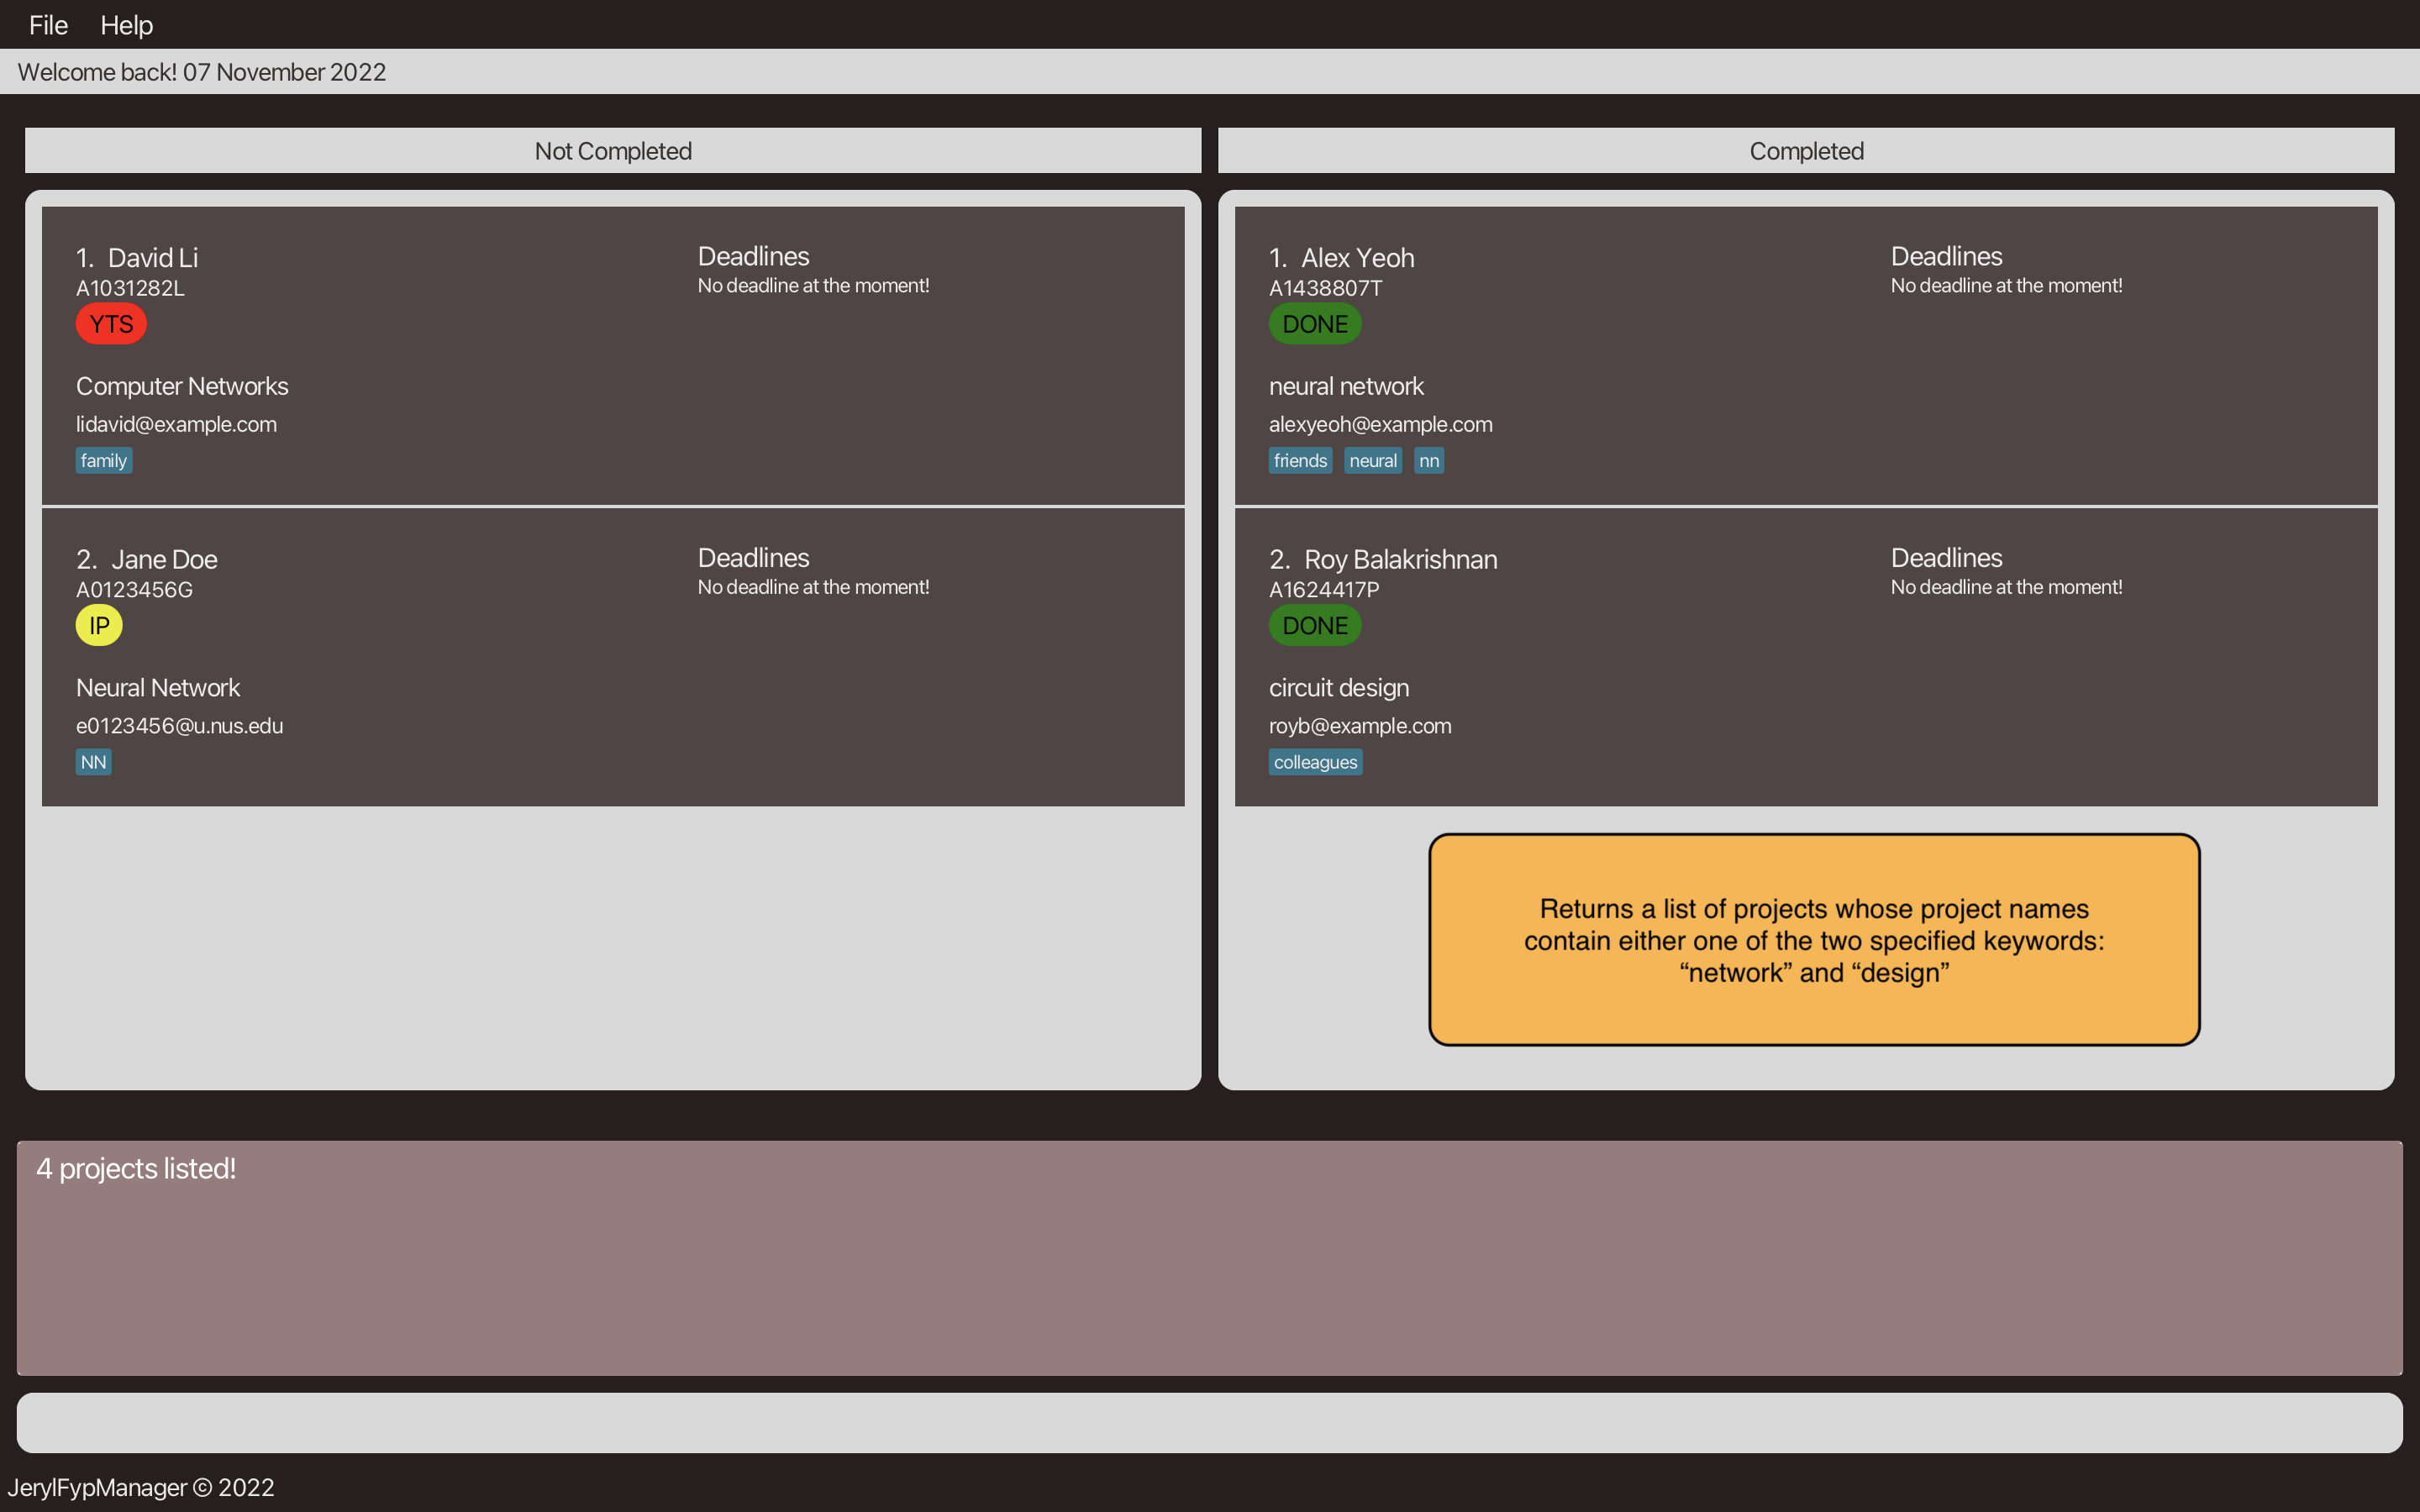
Step 4: The user is unsure of the correct names of the projects that he wants to find, and decides to find for
multiple keywords network / design. The user keys in find -p network / design to find all projects whose names
contain either the keywords network or design. FypManager returns a list of projects whose names contain at least
one of the two keywords.
The following sequence diagram shows how the FindCommand operation works:
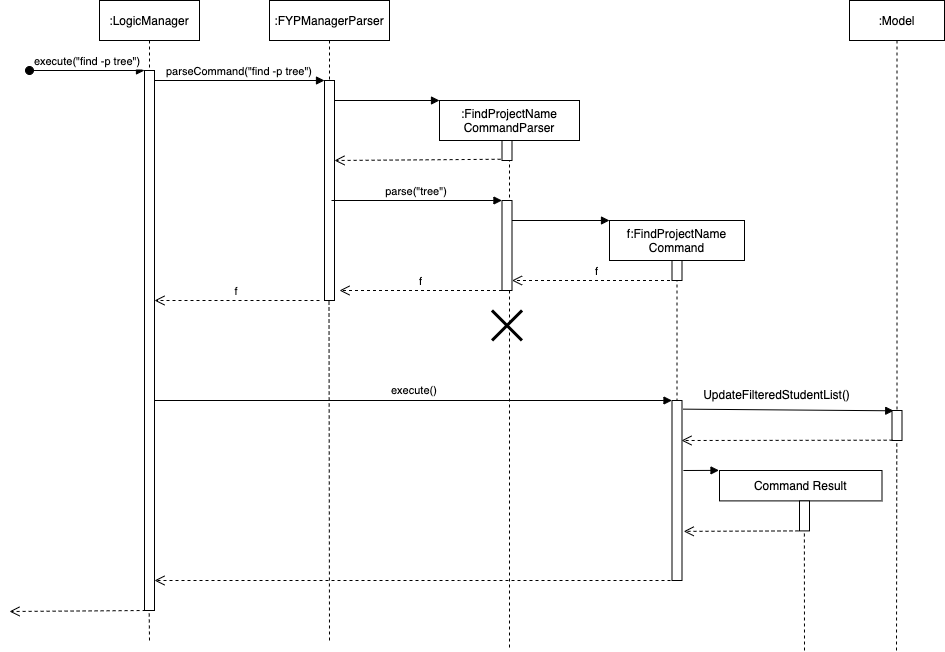
The following activity diagram summarizes what happens when a user executes a list command:
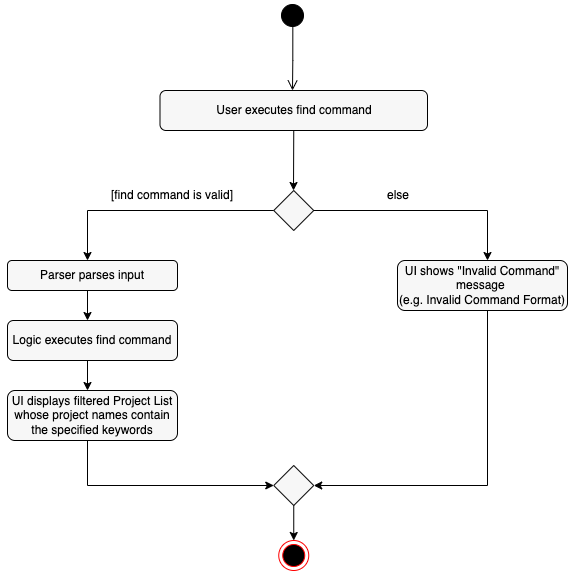
Design considerations:
Implementation Choice: Why FindCommand is implemented this way
-
We have implemented FindCommand to find a student’s project by four different fields. This is practical, since different users would want to find the relevant projects by different fields, making this a more versatile tool to use as a FypManager tool.
-
We have allowed the user to be able to search using different keywords (so long as they are separated by / ), which lets the user be more flexible in his/her search criteria.
-
Furthermore, we have made the input more flexible by making it case-insensitive, helping users who are not particularly careful with their input of capital-cases or lower-cases. This also mimics real-life query engines, which usually allow users to type their search keywords without fretting about whether there are upper-cases in the keyword.
Other Alternatives:
-
Alternative 1: Extend the FindCommand by allowing the user to search by fields other than project name
- Pros: Allows the users to search using more fields instead of ProjectName alone.
- Cons: Harder to implement. And requires inclusion of a suffix.
[v1.3 update: the above has been achieved as of this update. :) ]
-
Alternative 2: Allow the user to search for their keywords across all fields without specifying a field
- Pros: More comprehensive search for projects with the required keyword.
- Cons: Much harder to implement, as it requires a field-less search.
Sorting the FYP manager based on a criteria
Proposed Implementation
This feature allows professors to sort the FYP projects by their project name, or by the project status in the order {YTS, IP, DONE}.
Implementation details
The Sort feature is facilitated by 2 main Commands: SortProjectNameCommand and SortProjectStatusCommand.
Both of these commands extend from the abstract Commandclass. Note that we have fixed the sorting order
of SortProjectStatusCommand to be sorted in the order {YTS,IP,DONE} since projects that have YTS are more urgent,
hence we have placed them at the front of our FYP manager, followed by those that are IP, and finally
those that are DONE which are of the least urgency.
We give an example usage scenario of SortProjectNameCommand and SortProjectStatusCommand
-
SortProjectNameCommand- The user enters
sort -pif he wishes to execute theSortProjectNameCommand - FypManagerParser creates a new
SortProjectNameCommandafter preliminary check of user input. -
LogicManagerexecutes theSortProjectNameCommandusing theLogicManager#execute()method. -
SortProjectNameCommandcreates aCommandResultand returns it toLogicManager, which will be identified as aSortProjectNameCommandso that ourMainWindowwill show the sorted List.
- The user enters
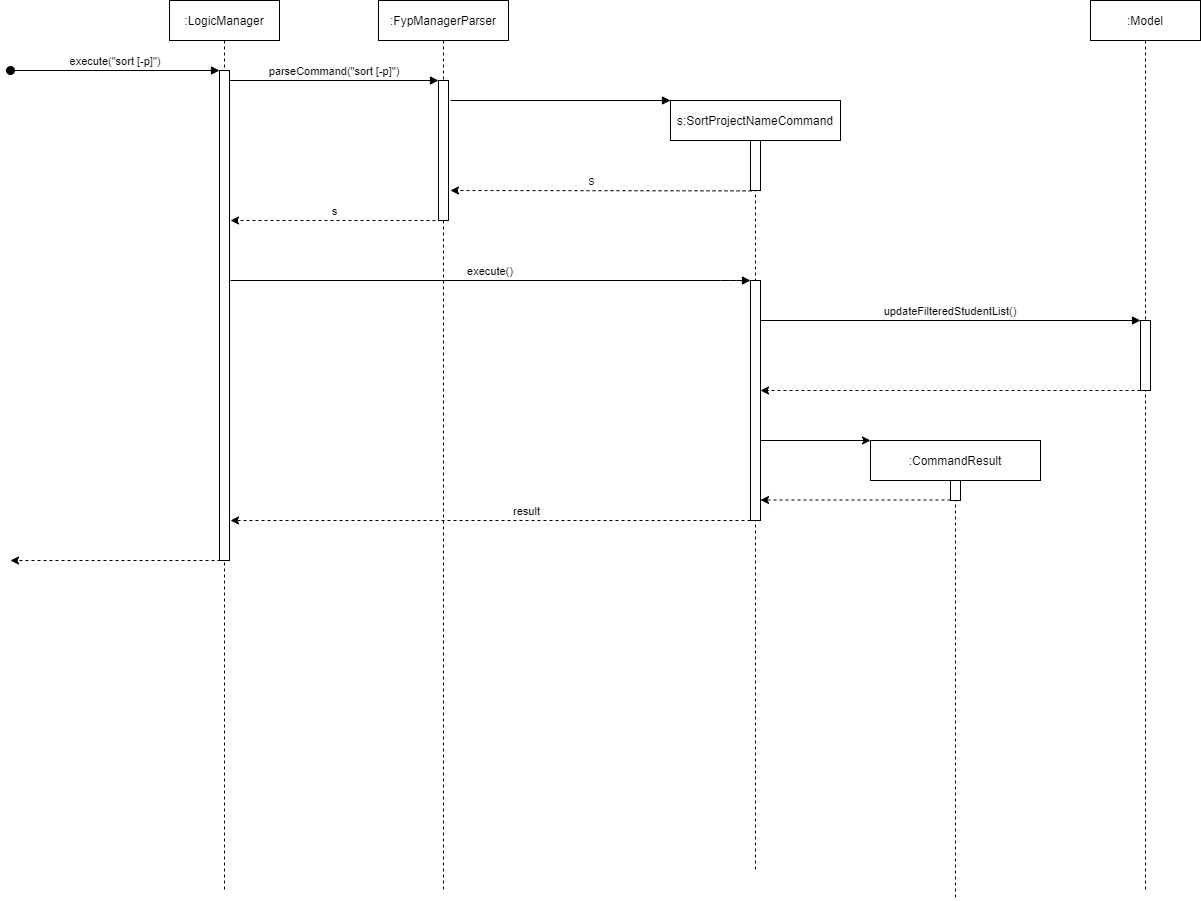
-
SortProjectStatusCommand- The user enters
sort -sif he wishes to execute theSortProjectStatusCommand - FypManagerParser creates a new
SortProjectNameCommandafter preliminary check of user input. -
LogicManagerexecutes theSortProjectStatusCommandusing theLogicManager#execute()method. -
SortProjectStatusCommandcreates aCommandResultand returns it toLogicManager, which will be identified as aSortProjectStatusCommandso that ourMainWindowwill show the sorted List.
- The user enters
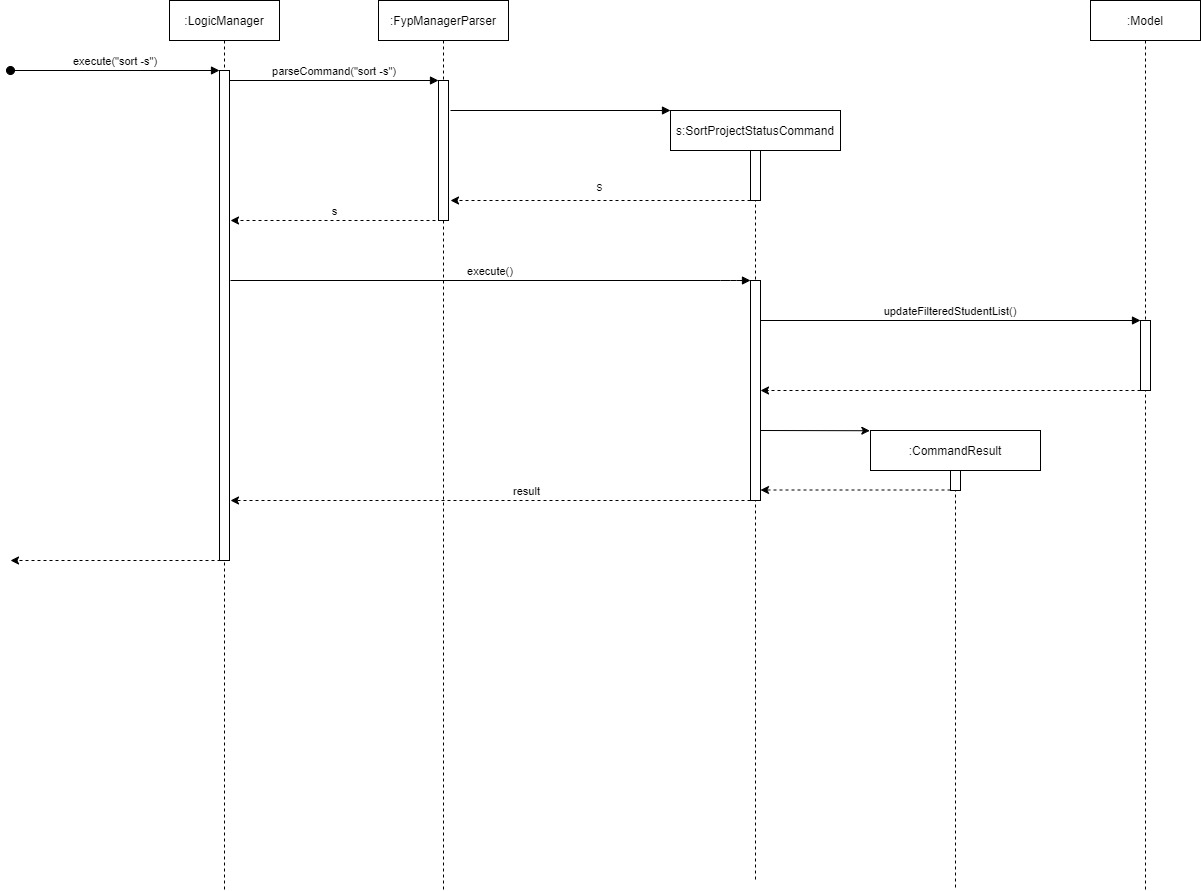
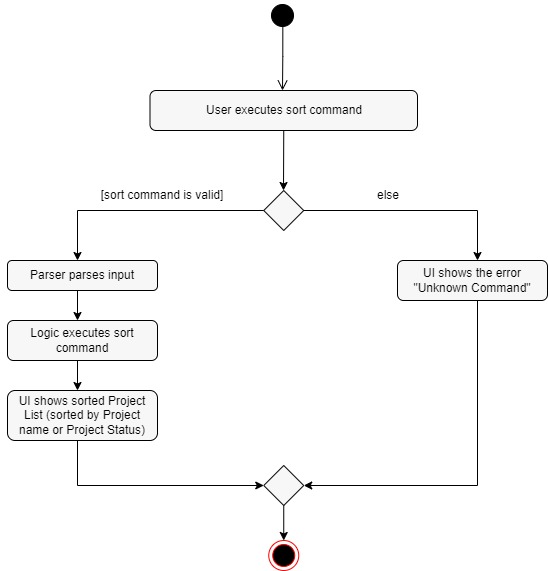
The following activity diagram summarizes what happens when the user runs a SortCommand:
[Proposed] Undo/redo feature
Proposed Implementation
The proposed undo/redo mechanism is facilitated by VersionedFypManager. It extends FypManager with an undo/redo history, stored internally as an fypManagerStateList and currentStatePointer. Additionally, it implements the following operations:
-
VersionedFypManager#commit()— Saves the current FYP manager state in its history. -
VersionedFypManager#undo()— Restores the previous FYP manager state from its history. -
VersionedFypManager#redo()— Restores a previously undone FYP manager state from its history.
These operations are exposed in the Model interface as Model#commitFypManager(), Model#undoFypManager() and Model#redoFypManager() respectively.
Given below is an example usage scenario and how the undo/redo mechanism behaves at each step.
Step 1. The user launches the application for the first time. The VersionedFypManager will be initialized with the initial FYP manager state, and the currentStatePointer pointing to that single FYP manager state.

Step 2. The user executes delete -s i/A0123456A command to delete student with studentId of A0123456A in the FYP manager. The delete command calls Model#commitFypManager(), causing the modified state of the FYP manager after the delete -s i/A0123456A command executes to be saved in the fypManagerStateList, and the currentStatePointer is shifted to the newly inserted FYP manager state.

Step 3. The user executes add -s n/David … to add a new student. The add -s command also calls Model#commitFypManager(), causing another modified FYP manager state to be saved into the fypManagerStateList.

Model#commitFypManager(), so the FYP manager state will not be saved into the fypManagerStateList.
Step 4. The user now decides that adding the student was a mistake, and decides to undo that action by executing the undo command. The undo command will call Model#undoFypManager(), which will shift the currentStatePointer once to the left, pointing it to the previous FYP manager state, and restores the FYP manager to that state.

currentStatePointer is at index 0, pointing to the initial FypManager state, then there are no previous FypManager states to restore. The undo command uses Model#canUndoFypManager() to check if this is the case. If so, it will return an error to the user rather
than attempting to perform the undo.
The following sequence diagram shows how the undo operation works:

UndoCommand should end at the destroy marker (X) but due to a limitation of PlantUML, the lifeline reaches the end of diagram.
The redo command does the opposite — it calls Model#redoFypManager(), which shifts the currentStatePointer once to the right, pointing to the previously undone state, and restores the FYP manager to that state.
currentStatePointer is at index fypManagerStateList.size() - 1, pointing to the latest FYP manager state, then there are no undone FypManager states to restore. The redo command uses Model#canRedoFypManager() to check if this is the case. If so, it will return an error to the user rather than attempting to perform the redo.
Step 5. The user then decides to execute the command Exit. Commands that do not modify the FYP manager, such as Exit, will usually not call Model#commitFypManager(), Model#undoFypManager() or Model#redoFypManager(). Thus, the fypManagerStateList remains unchanged.

Step 6. The user executes clear, which calls Model#commitFypManager(). Since the currentStatePointer is not pointing at the end of the fypManagerStateList, all FYP manager states after the currentStatePointer will be purged. Reason: It no longer makes sense to redo the add n/David … command. This is the behavior that most modern desktop applications follow.

The following activity diagram summarizes what happens when a user executes a new command:

Design considerations:
Aspect: How undo & redo executes:
-
Alternative 1 (current choice): Saves the entire FYP manager.
- Pros: Easy to implement.
- Cons: May have performance issues in terms of memory usage.
-
Alternative 2: Individual command knows how to undo/redo by
itself.
- Pros: Will use less memory (e.g. for
delete, just save the student being deleted). - Cons: We must ensure that the implementation of each individual command are correct.
- Pros: Will use less memory (e.g. for
{more aspects and alternatives to be added}
Future Implementations
- Sorting of deadlines could be considered as well
Exit Feature
Proposed Implementation
The proposed Exit Feature allows the professor to exit the FYP Manager.
The Exit feature mechanism is facilitated by ExitCommand. It extends from the abstract class Command.
To summarize, it implements the following operation:
-
ExitCommand#execute()— oversees the execution process forExitCommand.
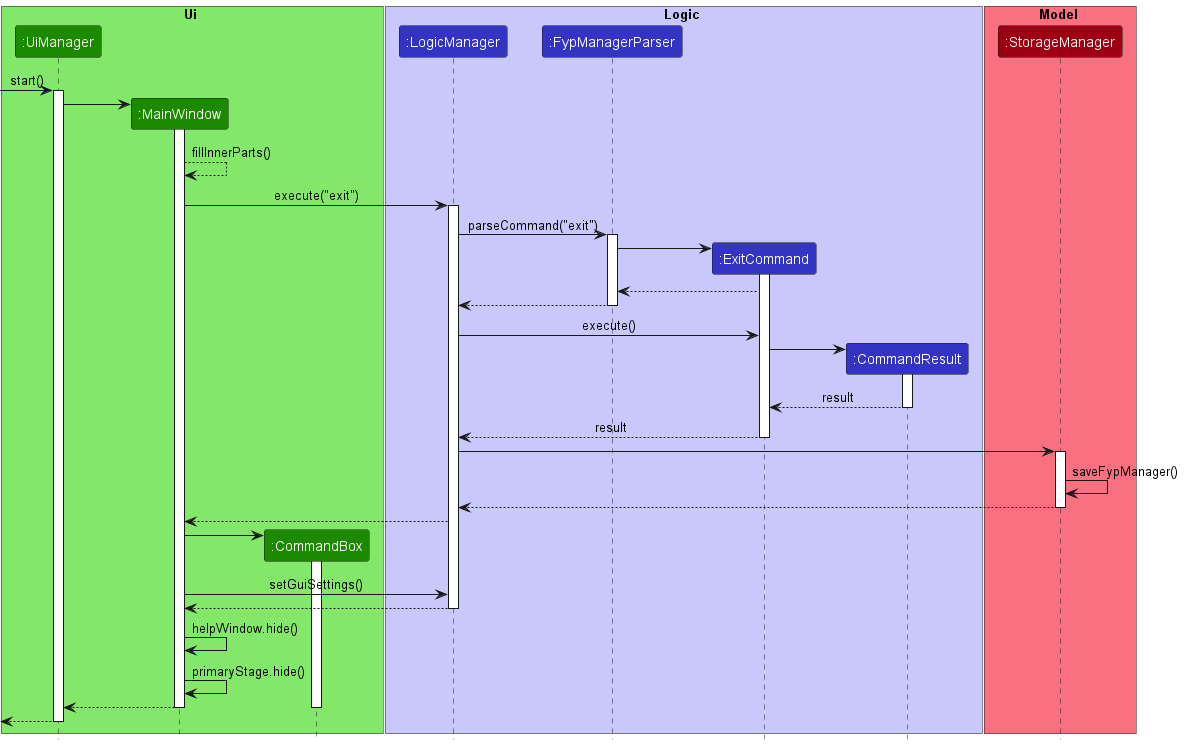
Given below is an example usage scenario of ExitCommand:
- The user enters the
Exitcommand. -
UiManagercallsMainWindow#fillInnerParts(). -
MainWindow#fillInnerParts()executes aexecuteCommand()and creates aCommandResult. -
LogicManagerexecutes theExitCommandusing theLogicManager#execute()method. 4.1.FypManagerParserwill parse the command usingparseCommandand generate 4.2.ExitCommandthen creates aCommandResultand returns it toMainWindowto complete the command. 4.3.StorageManagerwill save the record using methodStorageManager#saveFypManager(). -
handleExit()is then executed to hide the main window.
The following sequence diagram shows how the list command works:
Documentation, logging, testing, configuration, dev-ops
Appendix: Requirements
Product scope
Target user profile:
- NUS SoC Professors taking on and managing FYP students doing projects using SoC
- prefer desktop apps over other types
- can type fast
- prefers typing to mouse interactions
- is reasonably comfortable using CLI apps
Value proposition: To provide a platform for easier access to SoC professors to their students’ FYP status, rather than via plain e-mail correspondences.
User stories
Priorities: High (must have) - * * *, Medium (nice to have) - * *, Low (unlikely to have) - *
| Priority | As a/an … | I can … | So that I can… |
|---|---|---|---|
* * * |
responsible SoC professor | clear/mark done a project | provide timely updates for my students to track their FYP progress |
* * * |
first time user | view a list of commands that I can try as well as the details of each command | quickly start to manage my students’ FYPs using this system/app |
* * * |
no-time-to-waste SoC professor | search the projects using specific keywords | access the progress of projects of interest with just a few clicks |
* * * |
organised SoC professor | remove students if they dropped a FYP that was under me | keep the consolidated list of FYPs neat and organised |
* * * |
organised SoC professor | remove students if they completed a FYP that was under me, and move them to a “completed” FYP list | keep the consolidated list of FYPs neat and organised [coming soon] |
* * * |
SoC professor | add students if they are taking their FYP under me | keep track of those FYP projects under me easily |
* * * |
student with many email accounts | update my e-mail address when I change on the app | be easily contacted by my professors when they need to find me [coming soon] |
* * * |
SoC professor | view the list of all students taking their FYP under me | get to know more information about my own students |
* * |
responsible FYP student | check my upcoming deadlines with an option to see yet-to-submit deliverables | avoid missing any submission deadlines by accident [coming soon] |
* * |
SoC professor | view the progress updates that my students upload | deliberate about what the next course of action should be [coming soon] |
* * |
eager student | receive feedback promptly, i.e. read comments and suggestions from my professor ASAP | set a clear direction for my FYP in advance [coming soon] |
* * |
responsible FYP student | update my FYP progress through the app | inform my professor on my progress [coming soon] |
* * |
critical student | provide feedbacks on my FYP guidance and evaluations by my professor | help the FYP management team to further improve [coming soon] |
* * |
helpful SoC professor | put tags (e.g. “Ahead of time”, “Up to task”, “Behind schedule”) on my student’s FYP | clearly indicate my student’s progress relative to the timeline [coming soon] |
* * |
non-confrontational (i.e. shy) student | push certain tags (e.g. “Assistance required!”, “Unable to complete :(”) to the application | gather my professor’s attention without direct confrontation [coming soon] |
* * |
friendly SoC professor | share my availability with my students | be booked on consultation slots by my students [coming soon] |
* * |
troubled student | request for help from my professors by clicking on a button and indicating it’s urgency | alert the professor that I might need some assistance and how urgent it is [coming soon] |
* |
fun-seeking professor/FYP student | send “stickers” (similar to Telegram stickers) or emoji | have a fun experience while using the app [coming soon] |
* |
responsible FYP student | update my availability slots on the app | let my professor know when I will be available to meet [coming soon] |
* |
well-versed SoC professor | sort my student’s FYP based on what specialisation they are taking | organise the FYPs better [coming soon] |
* |
meticulous SoC professor | see student’s FYP sorted by research area first, followed by alphabetical order | gain quick and easy access to the details required [coming soon] |
* |
proactive FYP student | view available consultation slots with my professor on the app | easily plan my consultation sessions with my professor [coming soon] |
* |
forgetful FYP student | be updated in real time on any comments tagged with varying urgency levels | fix any urgent mistakes for clarification as my Professor goes through my FYP [coming soon] |
* |
organised SoC professor | set a deadline for one or more projects | advise my students on what to be prioritized [coming soon] |
* |
proactive student | turn off (or on) the notification email from professors at any time | avoid emails if I have already done the submissions [coming soon] |
* |
busy SoC professor | see my students’ project titles and summaries at one glance | save time from clicking into different links to access them [coming soon] |
* |
insecure FYP student | ring or notify my professor(s) for help via the platform | get the immediate help that I require [coming soon] |
* |
clear-minded SoC professor | filter the student’s FYP projects based on what specialisation they are doing (e.g. network research, AI) | gain quick access to the relevant FYP projects by categories [coming soon] |
* |
organized SoC professor | have a separate tab to store all the files that I send to or receive from my students | refer to the related files easily [coming soon] |
* |
punctual SoC professor | be alarmed of the upcoming meetings when it’s almost the time | join them on time. (e.g. 5 minutes before) [coming soon] |
* |
SoC professor who values maintainability | integrate some existing SoC-made softwares within | have more familiarity with the platform [coming soon] |
* |
constructive SoC professor | comment and suggest on my students’ current work | give my feedback in a fast and easy way [coming soon] |
* |
eager student | see the pending task with the next earliest deadline set by my professor | know what I need to do next for my FYP [coming soon] |
* |
automation-loving SoC professor | send auto emails to students with upcoming deadlines | remind them to work on the tasks by the deadline [coming soon] |
Use cases
(For all use cases below, the System is the JerylFypManager and the Actor is the Professor, unless specified otherwise)
1. Use case: UC01 - Adding FYP
Preconditions: Professor knows the details of FYP to be added
MSS
- Professor requests to add a student FYP into the list.
-
JerylFypManager adds the FYP details.
Use case ends.
Extensions
- 1a. The request given is invalid.
- 1a1. JerylFypManager shows an error message.
- 1a2. Professor enters a new request.
Steps 1a1-1a2 are repeated until the request entered is correct.
Use case resumes from step 2.
2. Use case: UC02 - Searching Keyword
Preconditions: Professor can recall part of the project name
MSS
- Professor wants to track the status of certain project(s).
- Professor searches the project(s) using a specified keyword.
-
JerylFypManager displays the search results with a brief summary for each project.
Use case ends.
Extensions
- 2a. The keyword given does not match any project name.
- 2a1. JerylFypManager shows an error message.
- 2a2. Professor tries again with another keyword.
Steps 2a1-2a2 are repeated until some projects are matched.
Use case resumes from step 3.
3. Use case: UC03 - Marking Project Status
Guarantees:
- Project Status goes from “Yet to Start” (YTS) to “In Progress” (IP); alternatively, from “In Progress” (IP) to “Done” (DONE).
Preconditions: Existence of said FYP in database
MSS
- Professor wants to modify the status of his student’s project, and he/she specifies the desired status change.
-
JerylFypManager toggles the status of the project.
Use case ends.
Extensions
- 1a. Professor’s input of Student’s ID / Status Tag is incorrect (e.g. misspell), or Professor is accessing FYP that does not exist.
- 1a1. JerylFypManager shows an error message.
- 1a2. Professor keys in his input again.
Steps 1a1-1a2 are repeated until the request entered is correct.
Use case resumes from step 2.
4. Use case: UC04 - Removing FYP
Preconditions: Professor can recall the name/ID of the FYP
MSS
- Professor requests to remove a student FYP from the list.
-
JerylFypManager removes the FYP details.
Use case ends.
Extensions
- 1a. The request given is invalid.
- 1a1. JerylFypManager shows an error message.
- 1a2. Professor enters a new request.
Steps 1a1-1a2 are repeated until the request entered is correct.
Use case resumes from step 2.
5. Use case: UC05 - Help List
Preconditions: Nil
MSS
- Professor requests from JerylFypManager to list all possible commands.
-
JerylFypManager shows the list of possible commands and the format to be entered in.
Use case ends.
Extensions
- Nil
6. Use case: UC06 - List FYPs
Preconditions: There exist FYP(s) in JerylFypManager
MSS
- Professor requests for JerylFypManager to show the list of FYPs.
-
JerylFypManager shows a list of FYPs to the professor.
Use case ends.
Extensions
- 2a. There are currently no FYPs that the professor is overseeing.
- 2a1. JerylFypManager tells the professor that he is currently not overseeing any FYPs.
Use case ends.
7. Use case: UC07 - Exit JerylFypManager
Preconditions: Nil
MSS
- Professor requests to exit JerylFypManager.
- JerylFypManager shows exit message.
-
JerylFypManager application is closed.
Use case ends.
Extensions
- Nil
Non-Functional Requirements
- Should work on any mainstream OS as long as it has Java
11or above installed. - User with above average typing speed for regular English text (i.e. not code, not system admin commands) should be able to accomplish most of the tasks faster using commands than using the mouse.
- The system should respond in at most 1 second.
- A user with no coding background should be able to use JerylFypManager.
- Notification sent to users upon updates to FYPs.
- Personal details of students should only be accessible by supervising professor.
- System should be able to support the whole SoC cohort (around 1500 users) at the same time.
- JerylFypManager is accessible 24/7.
Glossary
| Term | Explanation |
|---|---|
| Java | A programming language which was used to built FypManager. |
| Command-line Interface (CLI) | An interface which involves the users typing text and executing it as commands. |
| Graphical User Interface (GUI) | An interface which involves the users clicking buttons and selecting options from the menu bar. |
| Final Year Project (FYP) | A project taken by students in their final year of study. |
| School of Computing (SoC) | One of the faculties inside the National University of Singapore. |
| JerylFypManager | A platform used by SoC Professors for supervising student’s FYP. |
| Professor | An academic staff of SoC who is supervising a student’s FYP. |
| Student | A SoC student who is taking FYP in their final year of study. |
Appendix: Instructions for manual testing
Given below are instructions to test the app manually.
Launch and shutdown
-
Initial launch
-
Download the jar file and copy into an empty folder
-
Double-click the jar file
Expected: Shows the GUI with a set of sample students. The window size may not be optimum.
-
-
Saving window preferences
-
Resize the window to an optimum size. Move the window to a different location. Close the window.
-
Re-launch the app by double-clicking the jar file.
Expected: The most recent window size and location is retained.
-
Saving data
-
Dealing with missing/corrupted data files
- If a data is corrupted, it will restart with a fresh new empty data.
- If the data is missing, it will make use of the sample data instead.